Team Camaro Tech banner
1 - 18 of 18 Posts

Raysdz

· Registered
Joined
·
114 Posts
Discussion starter · #1 ·
Hello all.

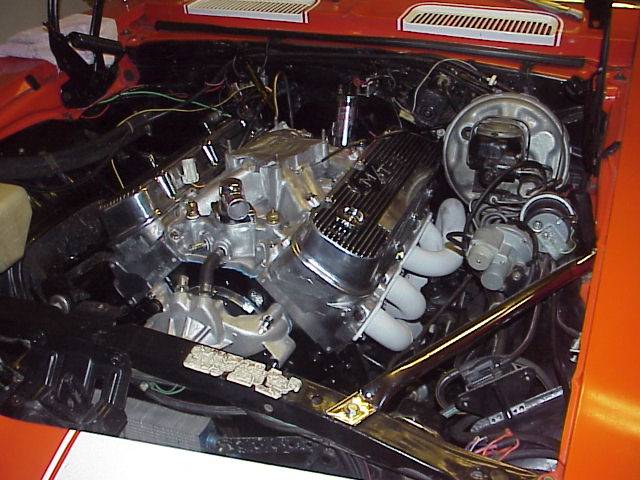
I just installed a pair of Hedman Ceramic headers ( 1 3/4 )on my 69 Camaro with manual steering.

The headers look great and the install wasn't too bad, but required raising the car a minimum of 3 feet and raising engine from it's mounts to install the driver side headers. Once installed I lowered the car so I could finsih installing the headers.
I kept the plastic bag that the headers were shipped in on the headers so as not chip or scratch the finsh during install.

I used the soft aluminum gaskets by Percy's rather then the ones supplied by Hedman.

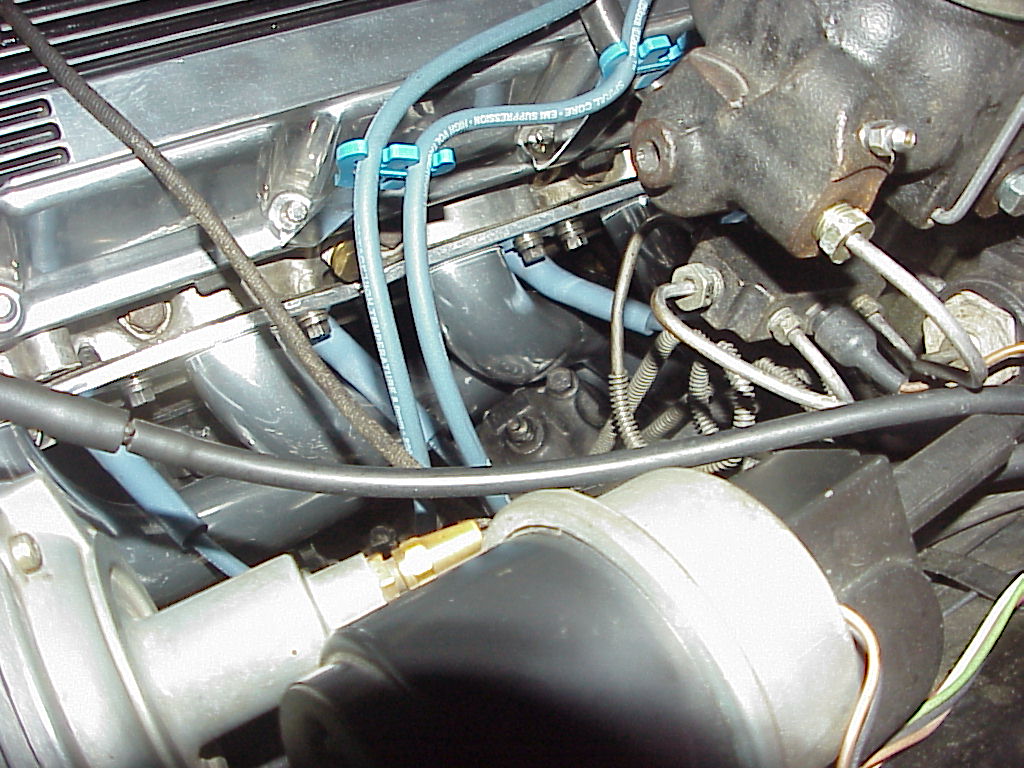
While removing the plastic I found that the header is tight up against the front edge of steering box. I mean TIGHT as in No Clearance.

I really want to go with the Hedman pipes and considering releaving the steering box to gain the needed clearance. I am unsure on how thick the steering box wall is.

I know I could pull them and return, but they look just to darn nice to toss in the towel.

Suggestions please.

Ray
 
Discussion starter · #2 ·
The Hedmans tuck up close to floorboard and if there was an optional engine mount that would alow the motor to set slightly lower in bay, that may do the trick.

Am I dreaming here ?

Thanks
 
Shim either the engine stand or motor mount to raise the engine a bit?
 
Discussion starter · #4 ·
I was just out looking over the clearance issue. The header is just contacting the box at the very forward edge.
I will give your advice some thought.
I was considering pitching the motor as you mentioned. However, it seems if I went lower with the motor the pipe would clear.
No clue if anyone makes a thinner mount.
I also thought of slightly raising the trans at the rear housing mount to see if a slight shim here would pitch the motor slightly downward and clear box.
I contacted Summit and they mentioned this happens from time to time and guys go grinding.
Thanks and will look this over more.
I can't remember how much play was in the steering box where it mounts to frame. Maybe I can reposition the box slightly.
Bottom line Dynamite looking pipes.
 
Discussion starter · #5 ·
I just tried raising motor slightly by adding a shim between the mount and block. NO dice.
Raising worsens the clearance problem.
Motor needs to to be lower.

OR grind the box.

Box wall thickness ?

OR who sells a low profile motor mount ?

I have to think this problem is not all that uncommon.

Thanks
Check the height of your mounts and call NPD. I actually had the opposite problem, and had to get a taller mount.
 
Doesn't anyone here run a BBC in a first gen? Here's what you learn to do. 1. Header mounted. 2. Sharpie-mark the exact spot of contact. 3. Remove header. 4. Lay header on soft (sorta) material with the 'mark' toward you. 5. Place a round HARD object against the mark. (a 3/4" socket is great) 6. Hit it with a BFH.
Yep, a dent. All you need is enough to miss the steering. A quarter inch or so. And it'll look just fine. The ceramic coating will be mostly OK. And a dent there, is just telling the world that you bought the biggest pipes you could because you have a really really powerful engine.:thumbsup:
 
Discussion starter · #8 ·
Thanks for the tip.

I am now thinking of just pulling, returning and upgrade to Super Comp Ceramic headers.

I hear they are the BEST fit.

The price difference between the Hedman's I have and the Super Comps is significant, but I have been told they will fit.

ANY Comments concerning the Super Comps is welcomed before I make the plunge.

Thanks All.

Ray
 
I know of at least 3 people with supercomps that have ground clearance issues, 2 are on sbc cars, and one is on a bbc.
Supercomps are nice, but more expensive than hedman, hedmans prices and quality are difficult to beat.
I have 1-5/8 headmans with a 3" collector that fit perfectly, only drag on ridiculous speed bumps.
 
Thanks for the tip.

I am now thinking of just pulling, returning and upgrade to Super Comp Ceramic headers.

I hear they are the BEST fit.

The price difference between the Hedman's I have and the Super Comps is significant, but I have been told they will fit.

ANY Comments concerning the Super Comps is welcomed before I make the plunge.

Thanks All.

Ray
Comments? Yeah, I've got a few,,,,.:mad: This from my web site;

Well, this picture makes the work look better than it was. The new headers are causing several unseen problems.
1. The locking steering column lock lever hits the #5 tube. I had to reverse the actuating rod and also bend the column lever.
2. The number six tube was touching the upper idler arm mounting bolt.
3. The #2 tube was interfering with the tie rod end. It needed to be dented-in a quarter inch.
4. And look at that spark plug access for #'s 5 and 7! Number 5 plug can only be installed with an open-end wrench on the socket and #7 can only be accessed from below by JACKING UP THE CAR. Even the plug wire has to be routed to the rear of the head and come up from below!
5. Don't forget the pound of iron I had to grind off of the block to recess the starter motor. And it's a mini starter!
6. After starting the engine a new vibration was apparent. The #5 tube was hitting the power steering steel line. I bent it clear. Of course that is not the fault of Hooker. These headers are sold for non-power steering cars.
7.The drivers side collector flange is rotated so as to place the wider bolt area straight down to reduce ground clearance needlessly.
I sure wish I had my Mickey Thompson Super Scavengers back.
UPDATE; Add another outrageous design feature. (02/29/2008) I just removed the passenger header to have a bung welded to it for the O2 sensor of the new Retrotek fuel injection. I HAD TO PULL THE ENGINE MOUNT BOLT and jack up the engine so all the twists and turns of the pipes would clear the frame. That makes 8 crappy faults and counting! Grrrr
I'VE HAD IT! These damn things are OUT. Wanna buy 'em? A good man at the Team Camaro site knew how much I hated these things and wished I had my MT Super Scavengers back. Well, he found them in reproduction!!!! I bought them. Check out film strip #5, photo #372. http://epitomesrebuild.com/images/229.JPG


Image
 
Comments? Yeah, I've got a few,,,,.:mad: This from my web site;

Well, this picture makes the work look better than it was. The new headers are causing several unseen problems.
1. The locking steering column lock lever hits the #5 tube. I had to reverse the actuating rod and also bend the column lever.
2. The number six tube was touching the upper idler arm mounting bolt.
3. The #2 tube was interfering with the tie rod end. It needed to be dented-in a quarter inch.
4. And look at that spark plug access for #'s 5 and 7! Number 5 plug can only be installed with an open-end wrench on the socket and #7 can only be accessed from below by JACKING UP THE CAR. Even the plug wire has to be routed to the rear of the head and come up from below!
5. Don't forget the pound of iron I had to grind off of the block to recess the starter motor. And it's a mini starter!
6. After starting the engine a new vibration was apparent. The #5 tube was hitting the power steering steel line. I bent it clear. Of course that is not the fault of Hooker. These headers are sold for non-power steering cars.
7.The drivers side collector flange is rotated so as to place the wider bolt area straight down to reduce ground clearance needlessly.
I sure wish I had my Mickey Thompson Super Scavengers back.
UPDATE; Add another outrageous design feature. (02/29/2008) I just removed the passenger header to have a bung welded to it for the O2 sensor of the new Retrotek fuel injection. I HAD TO PULL THE ENGINE MOUNT BOLT and jack up the engine so all the twists and turns of the pipes would clear the frame. That makes 8 crappy faults and counting! Grrrr
I'VE HAD IT! These damn things are OUT. Wanna buy 'em? A good man at the Team Camaro site knew how much I hated these things and wished I had my MT Super Scavengers back. Well, he found them in reproduction!!!! I bought them. Check out film strip #5, photo #372.


Image
X2 !!!!! If the Hedman's can be massaged ever so slightly I would use them as you already have them!!!!!!!!

David F.
 
David, have I thanked you today for being that 'good man'?
 
David, have I thanked you today for being that 'good man'?
:beers: Fred, It was my pleasure to help you with your quest to find those M/T Super Scavengers...when I saw that thread on Team Chevelle I knew instantly that you would want to know about it and I couldn't let the opportunity pass you by:noway:. I know you must be absolutely thrilled to have those beautiful headers now !!!!!!

Kind Regards,
David F.
 
Ray manual steering box is fairly thick walled. Easy to pull the cover off after you remove the jam nut, use a straight slot screwdriver to hold the lash setting while backing off the nut. With the cover off you can see how much material you can remove. If you move the adjustment screw it's easy to reset the lash on the box. Happy to see someone else still runs manual steering besides me. Thought I was the only one, LOL.
 
Tape, 5/8 socket, hammer

I had to do this to my Hedmans(jet hot coated) to fit................I taped the tube up with blue painters tape. I layed the header on a packing blanket, then layed the 5/8 socket on it's side on the tube, then smacked it with the hammer. Pulled the tape, no damage to the ceramic coating and the header fits fine. Just my .2
Thanks for that John. My wife helped me install the new Mickey Thompsons. The original set that I bought in '69 just touched the steering box. Well, the new ones are exactly the same. I used your method. For some reason your idea stuck in my mind.;)

Image


AND THANKS AGAIN DAVID!
 
1 - 18 of 18 Posts