

Items Needed: I am assuming Black Interior.
q Close Hanger
q Needle Nose Pliers
q Medium Phillips Screwdriver
q 5 Gallon Bucket of Lacquer Thinner
q 5 Gallons of Prep & Etch (from Home Depo/ Lacquer thinner Department)
q 5 Gallon Bucket of Water
q Nylon Scrub Brush
q Small Brass Brush
q Small Paint Brush
q Lithium Grease Paste
q Rustoleum 7777 It is at Home Depo in the spray paint department.
q Eastwood Black Etching Primer
Obviously you do NOT have to use any of the products above. They are just for the person that has no idea where to start or just does not want to think about it.
Getting ready to dissasemble them:
1) Remove Tracks (store all springs and bolts)
Also, Notice the Spring in this picture. Notice another hole more to the outside of the lever. When I was younger and would adjust the seats for taller guys, this spring would be on either one of the two holes. So both are correct. When it was to the outside hole (the one it is NOT on now) it would damage the vinyl easier. That is the one I would say it was on the most. The inside one looks better and is safer. I like it better. That is the one it is on now. I will clear this up later if any part of it is not clear here. Also notice the rusty rail!
![Image]()
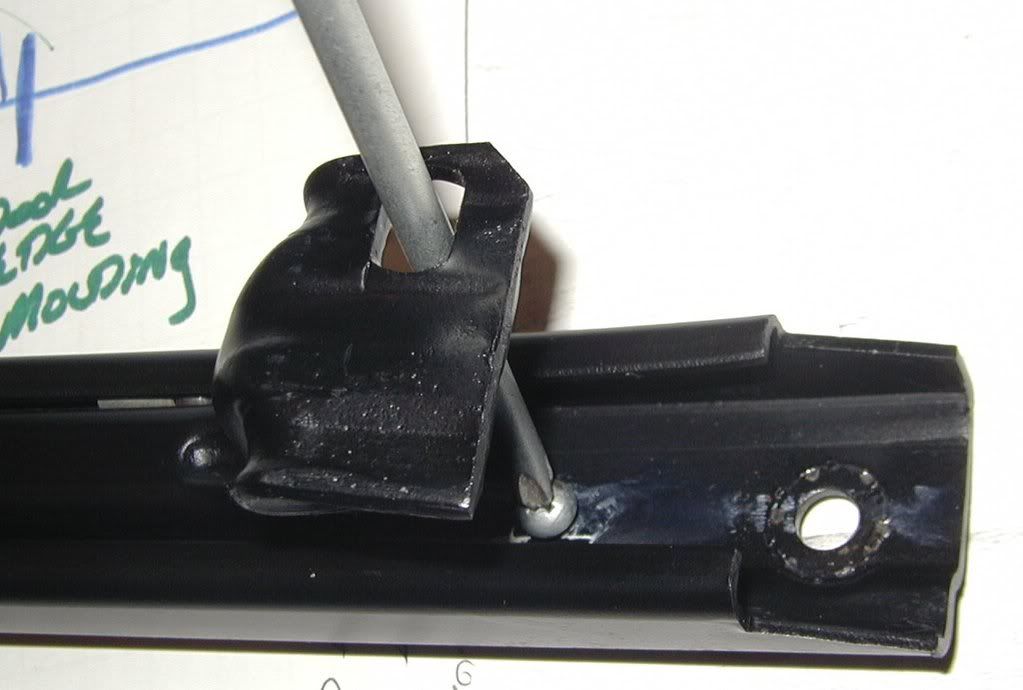
2) Remove the screw on the tracks – This screw helps keep the bearing in or keeps the track together. Depending on your point of view!
![Image]()
3) Take a clothes hanger and with the tip of needle nose pliers make a hook on the end. It really can be as small as you can make it comfortably without slipping off the hanger.
4) Use this hook to grab the bearing roller assembly and pull it out. Most of the time it is easier to pull it out if you are pulling the bearing assembly while pulling the two track pieces apart. If it is really jammed, spray it with WD 40 since you will be soaking in lacquer thinner anyway. Now they are separated.
![Image]()
5) Always were Chemical Gloves when working with CHEMICALS. Clean all the parts – You can do a number of ways. I soak in lacquer thinner in another 5 gallon bucket (some plastic buckets will fall apart and make a mess with lacquer thinner. Most white chemical buckets will work fine. Test them first) and use a brass brush to remove any and all old grease (if your still have any left). Also use the brass brush to clean the springs. (Remember they clean better if you spread them apart.) Then rinse in water. You don’t need soap, water wins the Chemical battle here. Bending the springs in the water will help clean/rinse them also.
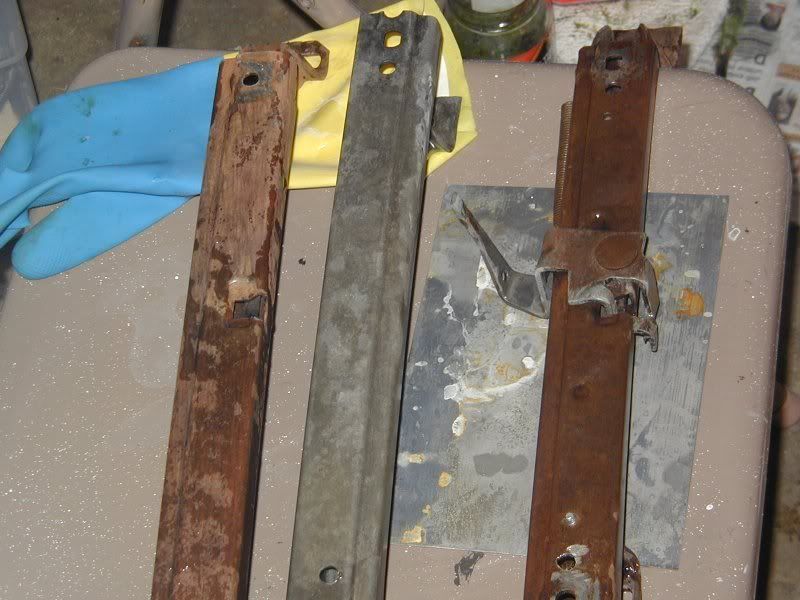
6) Always were Chemical Gloves when working with CHEMICALS. Now soak most the pieces in the Prep & Etch. They will look like brand new. Guys on-line are always telling you to dilute this with water. There is no reason to do that. In fact, it just makes it take WAY LONGER TO REMOVE THE RUST. Also, don’t worry about how long it is in the bucket. That won’t make a difference either. But for sure they will be rust free after 48hrs (and probably much sooner). Don’t forget to soak the springs. I would not soak THESE bolts unless they are rusted. After Soaking them, now rinse them in water using a nylon brush to clean away the residue and an oxidation like substance. Bucket or hose will work fine.
This picture below shows the Rusty ones NOT in Prep & Etch and the one done. It looked better than the picture.
CAUTION: (For future stuff: If it is not steel, this product can & will disolve other metals. I can not teach you how to tell the differences here. Just use caution. Example, if aluminum - it will disappear!!)
![Image]()
If you are restoring your car and you already do not have 5 gallons of the Prep & Etch, you will call yourself an idiot for not buying it sooner.
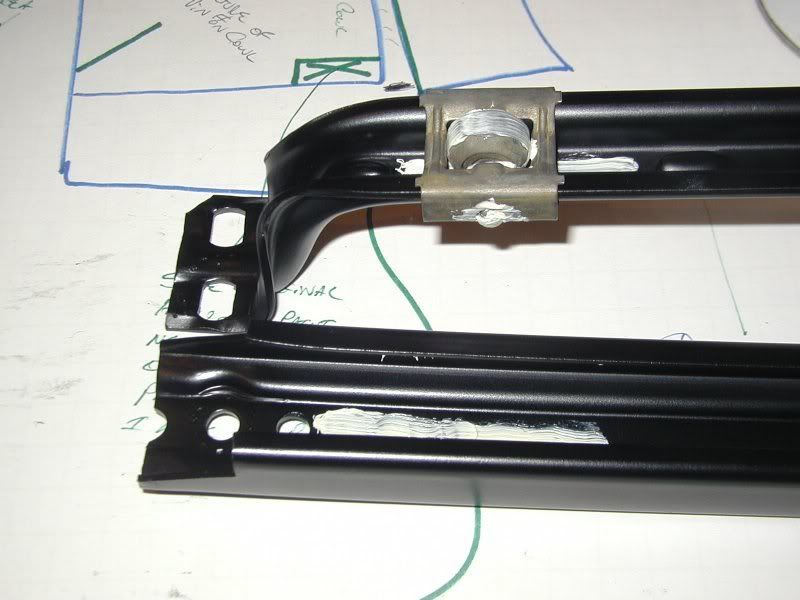
7) Prime in Eastwood Black Etching Primer. Don't paint any part of the bearings or the bearing holder (like the picture below). Also, don't paint the bolts unless they are in bad shape. If you figure a way to spread the springs a little, they will paint/prime better. Make sure NO "crap" is inbetween the spring coils before you prime & paint. Bending the springs helps you clean them. Again, there are ways to stretch them also!!
![Image]()
8) Paint in Rustoleum 7777, or others or shoot with a gun (no bullets!!). If you paint a flat black they look really cheap with black carpet. It is OK to paint the entire track. The grease will be fine with the paint.
9) Set aside all painted part for a week of good drying time, then I lube them with Lithium Grease. Pay attention to where the rollers will touch and where the metal will touch to do the best job. I used a small paint bruch to put it on.
10) Slide them back together with the bearings and you are done. DON'T forget to put the small screw back in!
![Image]()
11) Attach the CHROME handle NOW. This way you do not see the allen screw. If you have an original unrestored low mileage 67 Camaro, PM me. I have a question for you.
![Image]()
12)http://www.camaros.net/forums/showthread.php?t=152422 Thread for Seat Adjustment. Read this before you attach rails to seats.
The passenger seat did not have this adjustment.
13) Attach Rails to Seat now putting in the best spot for your height. If you are really short, move up. If really tall, move back.
14) It is also a really good idea to bolt them to the floor when you are all done!
q Close Hanger
q Needle Nose Pliers
q Medium Phillips Screwdriver
q 5 Gallon Bucket of Lacquer Thinner
q 5 Gallons of Prep & Etch (from Home Depo/ Lacquer thinner Department)
q 5 Gallon Bucket of Water
q Nylon Scrub Brush
q Small Brass Brush
q Small Paint Brush
q Lithium Grease Paste
q Rustoleum 7777 It is at Home Depo in the spray paint department.
q Eastwood Black Etching Primer
Obviously you do NOT have to use any of the products above. They are just for the person that has no idea where to start or just does not want to think about it.
Getting ready to dissasemble them:
1) Remove Tracks (store all springs and bolts)
Also, Notice the Spring in this picture. Notice another hole more to the outside of the lever. When I was younger and would adjust the seats for taller guys, this spring would be on either one of the two holes. So both are correct. When it was to the outside hole (the one it is NOT on now) it would damage the vinyl easier. That is the one I would say it was on the most. The inside one looks better and is safer. I like it better. That is the one it is on now. I will clear this up later if any part of it is not clear here. Also notice the rusty rail!

2) Remove the screw on the tracks – This screw helps keep the bearing in or keeps the track together. Depending on your point of view!
3) Take a clothes hanger and with the tip of needle nose pliers make a hook on the end. It really can be as small as you can make it comfortably without slipping off the hanger.
4) Use this hook to grab the bearing roller assembly and pull it out. Most of the time it is easier to pull it out if you are pulling the bearing assembly while pulling the two track pieces apart. If it is really jammed, spray it with WD 40 since you will be soaking in lacquer thinner anyway. Now they are separated.

5) Always were Chemical Gloves when working with CHEMICALS. Clean all the parts – You can do a number of ways. I soak in lacquer thinner in another 5 gallon bucket (some plastic buckets will fall apart and make a mess with lacquer thinner. Most white chemical buckets will work fine. Test them first) and use a brass brush to remove any and all old grease (if your still have any left). Also use the brass brush to clean the springs. (Remember they clean better if you spread them apart.) Then rinse in water. You don’t need soap, water wins the Chemical battle here. Bending the springs in the water will help clean/rinse them also.
6) Always were Chemical Gloves when working with CHEMICALS. Now soak most the pieces in the Prep & Etch. They will look like brand new. Guys on-line are always telling you to dilute this with water. There is no reason to do that. In fact, it just makes it take WAY LONGER TO REMOVE THE RUST. Also, don’t worry about how long it is in the bucket. That won’t make a difference either. But for sure they will be rust free after 48hrs (and probably much sooner). Don’t forget to soak the springs. I would not soak THESE bolts unless they are rusted. After Soaking them, now rinse them in water using a nylon brush to clean away the residue and an oxidation like substance. Bucket or hose will work fine.
This picture below shows the Rusty ones NOT in Prep & Etch and the one done. It looked better than the picture.
CAUTION: (For future stuff: If it is not steel, this product can & will disolve other metals. I can not teach you how to tell the differences here. Just use caution. Example, if aluminum - it will disappear!!)
If you are restoring your car and you already do not have 5 gallons of the Prep & Etch, you will call yourself an idiot for not buying it sooner.
7) Prime in Eastwood Black Etching Primer. Don't paint any part of the bearings or the bearing holder (like the picture below). Also, don't paint the bolts unless they are in bad shape. If you figure a way to spread the springs a little, they will paint/prime better. Make sure NO "crap" is inbetween the spring coils before you prime & paint. Bending the springs helps you clean them. Again, there are ways to stretch them also!!
8) Paint in Rustoleum 7777, or others or shoot with a gun (no bullets!!). If you paint a flat black they look really cheap with black carpet. It is OK to paint the entire track. The grease will be fine with the paint.
9) Set aside all painted part for a week of good drying time, then I lube them with Lithium Grease. Pay attention to where the rollers will touch and where the metal will touch to do the best job. I used a small paint bruch to put it on.
10) Slide them back together with the bearings and you are done. DON'T forget to put the small screw back in!

11) Attach the CHROME handle NOW. This way you do not see the allen screw. If you have an original unrestored low mileage 67 Camaro, PM me. I have a question for you.

12)http://www.camaros.net/forums/showthread.php?t=152422 Thread for Seat Adjustment. Read this before you attach rails to seats.
The passenger seat did not have this adjustment.
13) Attach Rails to Seat now putting in the best spot for your height. If you are really short, move up. If really tall, move back.
14) It is also a really good idea to bolt them to the floor when you are all done!


