My 69 originally came with manual 4 wheel drum brakes. During the rebuild I switched to power brakes with front disc and rear drum. My brake pedal is WAY high off the floor. Probably 8 to 10 inches. Gas pedal to brake pedal separation is huge I think. Have to completely pick up my leg to get on the brake pedal. Is it normal for the brake pedal to be THAT high off the floor???

Brake pedal WAY high???
1 reading
Chris-in-Cali
- Status
- Not open for further replies.
21 - 34 of 34 Posts
Joined
·
10,183 Posts
jerome,
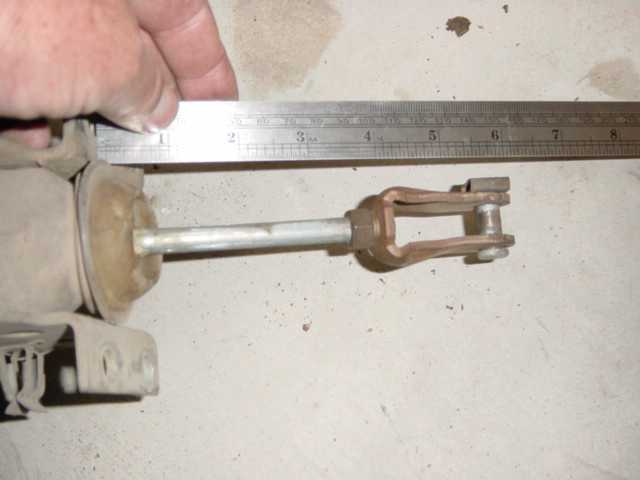
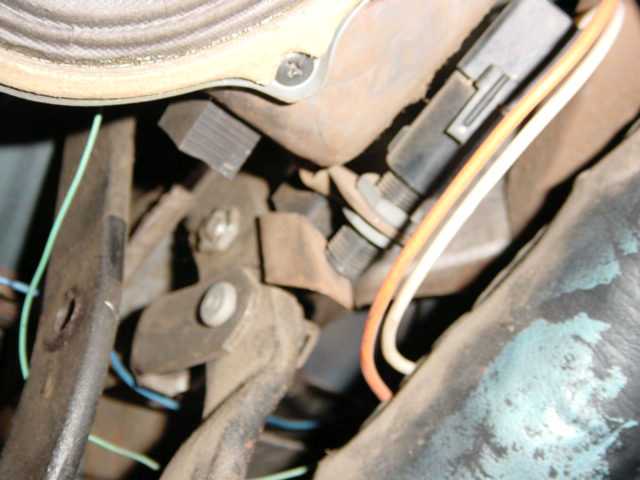
I can't find part #PT85, looked in two of my Rick's catalogs, one just came last week. I don't know exactly what bracket you are referring to. If you are referring to the brake light switch tab, mine is bolted into the upper "manual" hole, the clevis from the power brake booster is in the lower hole.
We also have a 73 Camaro, and it was set up the same with a metal tab off the top hole to contact the brake light switch.
A few years ago I took apart a very original 69 power disc brake master cyl, it had no residual pressure valve in the rear port. It started me thinking that sometime in the late 60's the RPV's may have been discontinued. I read somewhere rear drum brake seals were improved and no longer needed the RPV to make them hold fluid.
David
Joined
·
10,183 Posts
My booster pushrod was set up at 5.75" from bracket to pin.
![Image]()

Joined
·
1,999 Posts
Thanks David ,and yes the tab off the top manual hole is what I was referring to,I pulled it up on line in Ricks part search and it came up, thanks for the 2nd picture I did read about the 5.9 " dim. but was a little confused now I see it...thanks again and Happy Motoring
Joined
·
1,999 Posts
I tried removing my clevis pin last nite from the Manual hole and its up in the bracket cavity so it will not come out ,I am thinking even if I remove the break lite switch it will not move out of the bkt cavity enough to clear ,so it looks like I need to remove the pin holding the peddle's in ,drop them down just enough to remove the pin,looking at your picture it would be no prob., any suggestions ??? has anybody else had to remove there prddles and as long as i am pulling them ,I might as well rebush...Happy MotoringA rubber bumper is not needed, the booster controls pedal return NOT the bumper. The brake light switch will bottom out way before the bumper even comes close. IF the bumper or switch were to stop the pedal, the brakes might not fully release.
My Camaro came with manual brakes, the bumper is in place but not contacting the pedal. Sorry this photo is a bit fuzzy.
Here's a photo of the tab.
![Image]()
Joined
·
1,999 Posts
I worked on the brake rod ,and I had to take out the peddle rod and the peddles dropped down far enough to get the pin out, so I inspected the bushings on the P rod and were in good condition ,so I lubed up with white lith.grease, And reassembled .It went good, so now I will install the clevis on the new booster to 5.75 ,and disassemble the MC and lines and start to reassemble with all my new piece's. Happy Motoring to all.I don't know yet if I need the part pt-83 power brake lite extension.but looking at Davids picture I would think so.:yes:
Joined
·
1,999 Posts
I bumped this back up cause of theA rubber bumper is not needed, the booster controls pedal return NOT the bumper. The brake light switch will bottom out way before the bumper even comes close. IF the bumper or switch were to stop the pedal, the brakes might not fully release.
My Camaro came with manual brakes, the bumper is in place but not contacting the pedal. Sorry this photo is a bit fuzzy.
Here's a photo of the tab.
![Image]()
Possible confusion of where the rod and clevis goes ,it looks and after I read David's post his car is manual?? And his rod is attached to the bottom hole mine was attached to the top hole factory orig. does 67 to 67 make a diff. when going from manual to bower as I just completed and my rod is now attached to the bottom hole, maybe David and some other's can clarify that are very knowledgeable ??? Happy Motoring
1) Yes David's car is a manual trans. On the left of the pic, you can see the clutch pedal hanging down (sort-of) next to the brake pedal. The green wire just hooks behind it.I bumped this back up cause of the
Possible confusion of where the rod and clevis goes ,it looks and after I read David's post his car is manual?? And his rod is attached to the bottom hole mine was attached to the top hole factory orig. does 67 to 67 make a diff. when going from manual to bower as I just completed and my rod is now attached to the bottom hole, maybe David and some other's can clarify that are very knowledgeable ??? Happy Motoring
2) Power Brakes = booster rod in lower hole, brake switch bracket in upper hole. Manual Brakes = master cyl pushrod in upper hole, nothing in lower hole. This is true for (pretty much) all Chevy's from that era that offered both manual and power brakes. Drums/discs doesn't matter here either. Power drums OR discs = lower hole.
The net effect is that with power brakes (lower hole) you have less mechanical advantage with the pedal (about a 3.8:1 ratio versus 6.2:1 with the upper hole). This results in less pedal travel, but higher effort. Since the power assist helps take care of the effort, you just end up with less pedal travel (and a lower pedal height without the brakes applied, which is why you'll need the brake switch bracket)
Joined
·
1,999 Posts
David's brake lite switch bracket is in a diff. loc. than mine is, mine is located more FWD towards the pedal (stock pinch welded ) I did buy the bracket that attaches' to the upper hole and tried to use but would not fit correctly,also Matts classic was correct in telling me I did not need ???but I bought anyway cause of David's pic having it ( I took a copy of his pic. As reference and yes his bkt. Is more aft than mine ,so I was able to adjust my lite switch to contact the pedal. No prob.
There must( hast ) be a difference where the bkt is pinch welded due to manual drum stock vs power drum stock ??? Or +/- a few tenth's of an inch didn't matter to where they pinched welded the lite switch bracket, here I am analyzing again why this is different.any suggestions to why anyone... Happy Motoring
There must( hast ) be a difference where the bkt is pinch welded due to manual drum stock vs power drum stock ??? Or +/- a few tenth's of an inch didn't matter to where they pinched welded the lite switch bracket, here I am analyzing again why this is different.any suggestions to why anyone... Happy Motoring
Joined
·
10,183 Posts
That's interesting.
What is your brake pedal height from the floor? If it's higher than spec, then the switch may work OK but your pedal height will be too far off the floor.
David
What is your brake pedal height from the floor? If it's higher than spec, then the switch may work OK but your pedal height will be too far off the floor.
David
Joined
·
1,999 Posts
Yes I figured intresting too, I will measure ,but I kept the measurement of your booster bracket to clevis hole of 5.75 and then adjusted out the clevis maybe no more than .200 ,right now the pedel isThat's interesting.
What is your brake pedal height from the floor? If it's higher than spec, then the switch may work OK but your pedal height will be too far off the floor.
David
barely against the rubber stop (new stop), I think the measurement from the floor to pedal is 5.9,just mocking up my clutch linkage both pedal's are aprox even. If I am close to 5.9 then I would think the tolerance's GM worked with were wide, may make since ,as the lite switch has an inch of adjustment with all that thread that was manufactured into it. anyway her is a finished picture of the system ,I should of taken a pic. Of under the dash Happy Motoring

[/IMG] P.S. I don't know why my font changed??? had to add
Joined
·
1,999 Posts
Hi All ,The measurement from the floor to B pedal S/B 5.9 I was reading in an artical,I have a 6.1 so I am leaving and just going to test around the neighborhood ,when I get the Motor and trans in,I hope some of this helps when other's do this conversion, as our car's must very slightly to moderately...all I can figure ,I work daily with tolerances of +\- .005 on up, and our cars had wide tolerances built into..Happy Motoring 
Joined
·
1 Posts
where you get the bracketHey Jim ...
Where would I find this "bracket" and what's it called?
Thanks
Joined
·
5,994 Posts
Jack-This post is 16 years old. You would get a response if you started a new post with your issue. Be detailed.where you get the bracket
21 - 34 of 34 Posts
- Status
- Not open for further replies.
You have insufficient privileges to reply here.
-
?
-
?
-
?
-
?
-
?
-
?
-
?
-
?
-
?
-
?
-
?
-
?
-
?
-
?
-
?
-
?
-
?
-
?
-
?
-
?
- posts
- 2.4M
- members
- 90K
- Since
- 1998
A forum community dedicated to 1st generation Chevy Camaros owners and enthusiasts. Come join the discussion about performance, builds, restoration, modifications, classifieds, troubleshooting, reviews, and more!
Explore Our Forums


