

We purchased our 68 Butternut Yellow Z/28 in the early 80's and for all the good, bad, and ugly reasons the restoration process just sat. Now the time has come to start the process and thought it might be beneficial to someone (including keeping me on track) to update the restoration process via this thread. A little background first: 01B built Camaro with black std. interior, original born with engine, M21 trans. and rear. Fall of 2008 I found the original owner (Eddie M.) with an old 1972 Phillips 66 charge receipt that was under the front bucket seat carpet. Eddie was a great person to talk to along with being a car guy so he told me a lot about the Z/28. Purchased at Roger Dean Chevrolet in Charleston, WV in late March or early April, 68 according to Eddie. He told me he was the one who purchased and added the air cowl plenum and headers as he was into the trans-am scene and Mark Donahue. Verified as well that the Z/28 had come with 302 fender emblems but he later added the Z/28 emblems to the fenders. When my wife and I purchased the car way back when it had most of the things original except for a few items like the water pump, starter, exhaust manifolds (remember those headers) but most of the hard to find (high $ stuff today) was there.Some might ask since the car sat so long what prompted the recent start up? Well, for many years it was "I'm going to get to it one of these days" but it never happened and the reason became obvious to me that to do the car correct it was beyond my skills hence Lonny Gordon and his team at East Coast Muscle Cars were chosen. Their workmanship is just fantastic along with being just great people. So the journey begins but would not have without the support of my wife For those of us married, we know how important that is, right? :yes:
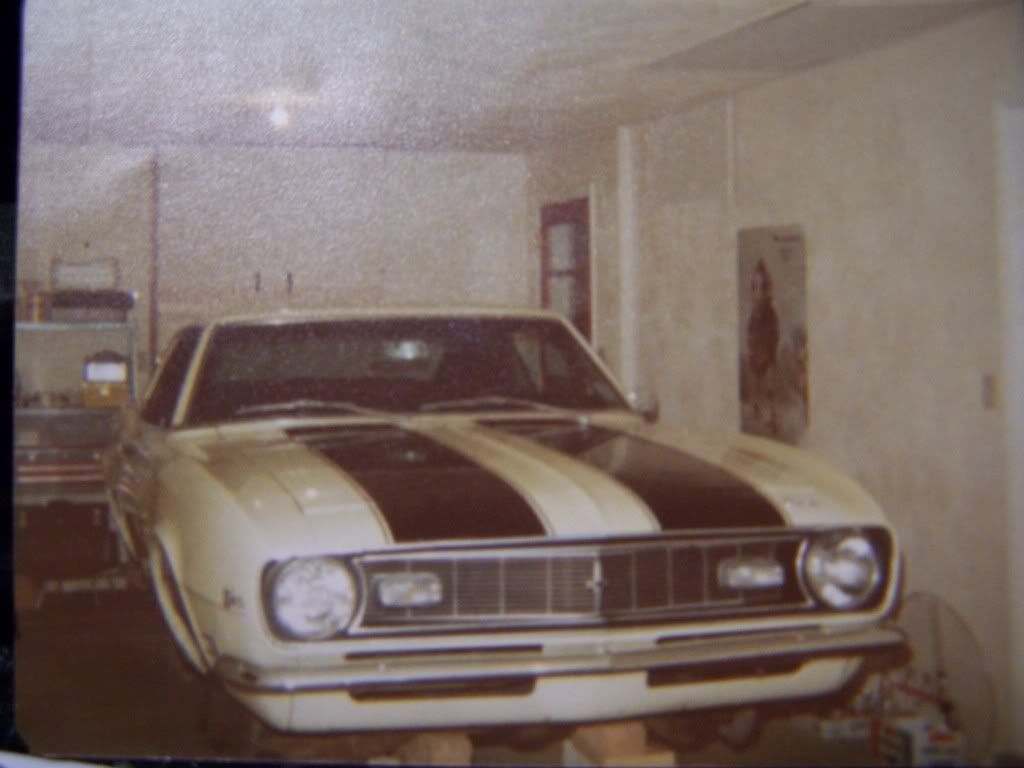
Here is the car in the late 70's!
![Image]()
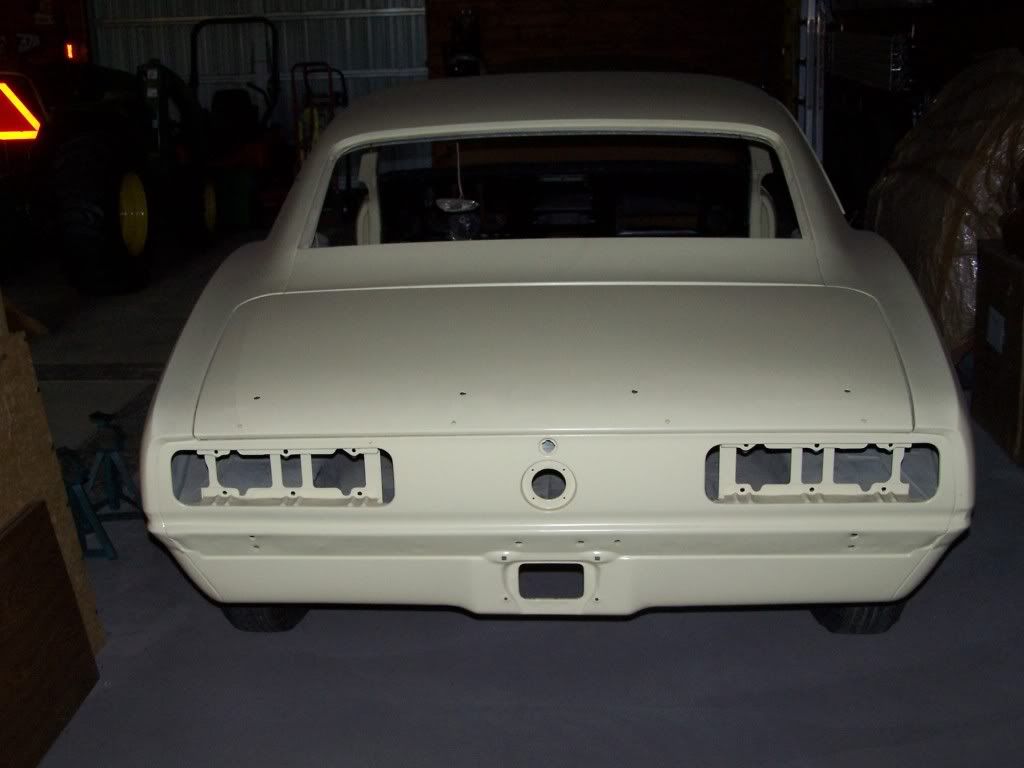
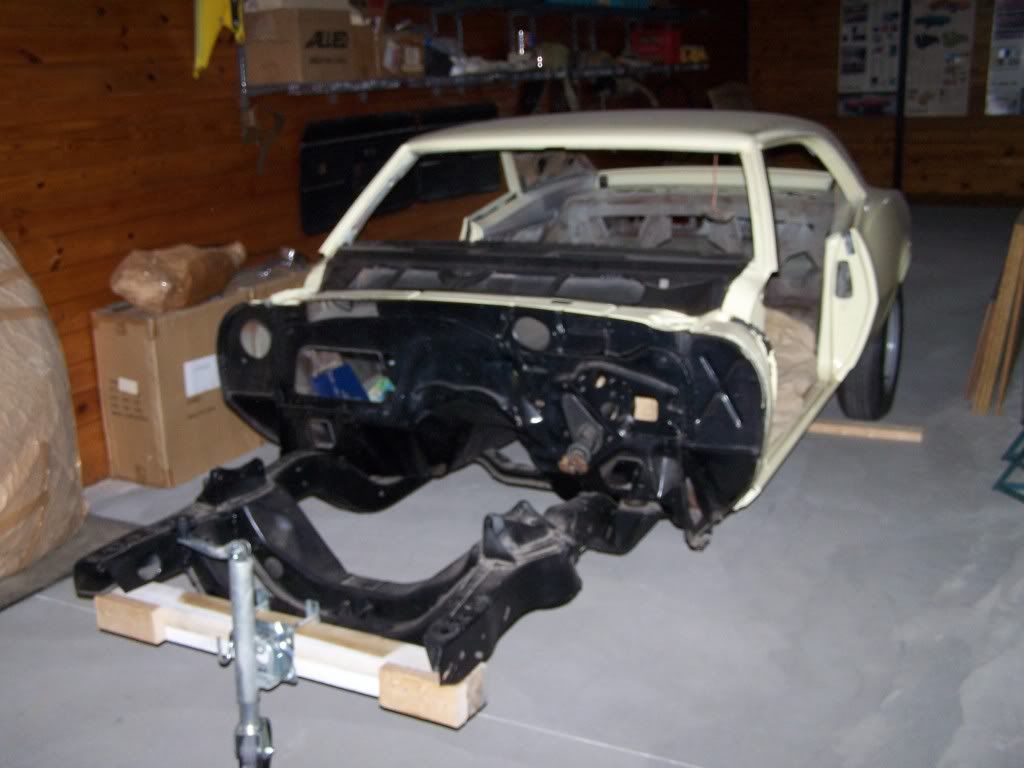
The Z just before it left for East Coast Musclecars!
![Image]()
![Image]()
Chick’s Team Camaro Build Thread - Time for Another 68 Z/28 to be Restored
Table of Contents
68Z-1970 Picture of Eddie Meadows (orig. owner) – Post 32
68Z-1983 Purchase - what I brought home in pieces - Post 1244
68Z-2010 How it looked from lacquer paint job in mid-80’s - Post 1
68Z-2016 Saw some sunlight for 1st time since 1979 – Post 1263
68Z-2017 Reunited with original owner Eddie Meadows – Post 1317
68Z-2017 Picture taking for Hemmings Muscle Machines – Post 1348
A-Arm assembly painted - Post 272
A-Arm rubber flap shields-drilling NOS inner fenders – Post 1045
A-Arm rubber flap shields making staples – Post 1045
A-Arm rubber material with cords – Post 971
A-Arm shims - Post 674
A-Arm upper rubber bumper #384220 - Post 214
Air cleaner connector #3923260 to valve cover - Post 592
Air cowl plenum air filter A226CW original vs. later - Post 236 & 241
Air cowl plenum air filter cheap replacement – Post 1191
Air cowl plenum carb stud – Post 1013
Air cowl plenum installed – Post 1191
Air cowl plenum original installation – Post 1011
Air cowl plenum original seal – Post 1013
Alternator - after restoration original dated 7H10 - Post 148
Alternator - before restoration original dated 7H10 – Post 46
Alternator brackets - comparing original GT stamp to reproduction stamp - Post 160
Alternator bracket to header and alternator installation - Post 795
Alternator bracket alignment front vs. rear on alternator - Post 800
Alternator bracket alignment rear of alternator vintage picture - Post 804 & 806
Alternator wiring boot original - Post 344
Aluminum restoration, intake and distributor – Post 128
Assembly of car - rear in subframe in front - Post 454
Assembly of cowl (Firewall) and under dash list – Post 839
Assembly of fenders and front end - 1069 & 1073
Astro ventilation parts and info - 764
Ball joints riveted - Post 160
Battery cable negative clips #3857706 - Post 609 & 612
Battery cable negative clips #3857706 located on frame - Post 621
Battery cable negative clips - how to install - Post 682 & 687
Battery ground for Y55 - location and hardware – Post 1191
Battery hold down clamp bolt - original with 0.87 inch diameter washer - Post 1293
Battery hold down clamp NOS correct piece – Post 860
Battery hold down clamp original vs. Service replacement- Post 366 & Post 490
Battery hold down clamp original dip painted and stampings – Post 1293
Battery hold down clamp painted original survivors (3) - Post 511
Battery hold down clamp restored and bolt – Post 1183
Battery tray – Post 1273, 1275, 1276, 1280, 1281, 1283 & 1287
Battery tray continued – Post 1291 & 1292
Battery tray continued - how to make tab correct - Post 1304
Battery Y55 NOS purchased 1983 (no Energizer script) – Post 1183
Battery Y55 NOS early 70’s vintage with Energizer script- Post 1261
Battery Y55 - How to gut – Post 1394 & 1396
Bezels - Side marker lights painting grooves black – Post 959
Body and components media blasted to bare metal – Post 8, 9 & 10
Body rubber flap in rear quarter housings - originals - Post 196
Body work – Post 53, 59, 61, 65, 69 & 98
Body work continued – Post 106 & 113
Brake booster hose bracket-original vs. reproduction - Post 269
Brake booster restored and hardware - Post 155
Brake booster valve comparisons original to later types – Post 814
Brake booster valve comparisons original to newer reproduction found – Post 1306 & 1309
Brake booster valve and seal #546180 both original - Post 607
Brake booster valve and seal with original clamp installed – Post 902
Brake clutch pedal assembly restoration - Post 410
Brake drum internal components and stamping - Post 258
Brake drum paint for components - close match - Post 262
Brake drum shoes and assembly - Post 486
Brake emergency cables with hardware installed – Post 1409
Brake hose rubber U-shaped clips - original to reproduction - Post 182 & Post 259
Brake hose rear original - Post 280 & 302
Brake line and hardware installed pictures – Post 1176
Brake line clips and hardware (note - ignore bluing for ’68) - Post 524
Brake line clips and hardware by part number in AIM - Post 541, 543 & 545
Brake line clips and hardware by part number in AIM - Post 587
Brake line rear bracket original vs. reproduction - Post 416
Brake line rear bracket with bolt attached to 12 bolt - Post 448
Brake master cylinder (found out later a re-stamp) – Post 129 & 796
Brake master cylinder and booster NOS 5/31/68 – Post 851
Brake master cylinder WT original vs. re-stamp – Post 1362
Brake master cylinder WT original rebuilt and valve with distribution block – Post 1365
Brake system directional block and valve restoration – Post 852
Brake system valve nut re-face (Note valve nut should be phosphate for ‘68, clear zinc for ’69) – Post 856
Bucket seat rail for seat in and out - Post 304
Bumper front installation – Post 1161
Bumper guards NOS – Post 114
Bumper rear NOS guards and installation – Post 1151
Bumper rear license plate light Bracket installation and light differences – Post 1146
Car Show: 11/2016 MCACN - Celebrity Pick Award winner – Post 1267
Car Show: 12/2016 East Coast Indoor Nationals December 2016 - Two awards – Post 1272
Car Show: 06/2017 Camaro Nationals, Gold – Post 1317
Car Show: 06/2017 Camaro Nationals judging demerits – Post 1329 & 1330
Car Show: 06/2017 Camaro Nationals judging demerits – Post 1349
Car Show: 06/2017 Camaro Nationals judging demerits – Post 1355 & 1360
Car Show: 11/2018 MCACN 999/1000 and Platinum Pick best stock Chevrolet – Post 1382
Car Show: 06/2019 AACA Senior award – Post 1398
Carb dated 7A1 List 4053 – Post 68
Carb manifold stud – Post 1087, Post 1111 & 1119
Carb manifold stud information (Stan NCRS judge) – Post 1189
Carb stud original ‘68Z - Post 592 & 1011
Car cover (have 4 of these) no longer available – Post 1157
Chromed original items - Post 757
Clutch bellcrank lower push rod - Post 791
Clutch fork #3892632 and spring - Post 590
Clutch fork hardware and GM number list - Post 683
Clutch fork spring and rod attachment issue with headers – Post 823
Clutch fork spring and rod attachment issue with headers fixed – Post 960
Coil spring tag Skip’s ‘68Z survivor - Post 540
Console gages original - Post 279
Console restoration pictures + (part numbers) and installed – Post 1138
Console special nuts #3792287 - Post 691
Cowl insulation under dash pad (NOS) - purchased 1979 - Post 414 & 419
Cowl insulation under dash pad (NOS) - purchased 1979 restored - Post 449
Cowl insulation under dash pad rubber plugs original #3868790 - Post 595
Cowl painted black - before paint Post 140 & after paint - Post 150
Cowl painted butternut yellow blend in - Post 243
Cowl panel seal #3927464 – Post 963
Cowl panel - Z28 stripe dimensions – original - Post 3 & 963
Cowl picture showing locations clips, lines, speedo, oil, grounds, etc. - Post 719
Cowl reverse backup light wiring to cowl connector - Post 726
Cowl seal #3927464 – Post 62
Cowl stampings PTB Post 692 & 698 (green)
Dash heater and defroster control panel restoration original - Post 775
Dash installed – Post 1111
Dealership script, Roger Dean added to car – Post 1265
Dimmer switch grommet original - Post 745
Disc brake caliper original 4 piston - Post 163 & painted Post 404
Disc brake distribution block and pressure regulation valve - Post 186
Disc brake hose bracket - Post 160
Disc brake hoses (NOS) - stenciled - Post 351
Disc brake mounting plate original re-plated - Post 249
Disc brake shoe kit #5470879 - Post 429
Disc brake pressure regulation valve ‘68 to ’69 – Post 877 & 880
Distributor cap D308/D308R - Post 594
Distributor original #1111266 dated 7A25 - Post 52 & 664
Distributor vacuum lines - Post 581
Door arm rest pads, original vs. PUI – Post 1080
Door glass hardware – Post 1053
Door handle gaskets (NOS) #1154551 - Post 377
Door handle original thickness vs. other years - Post 326
Door handle re-chromed and #9709600 push button - Post 374
Door handle ready for installation - Post 700
Door hinge area painted – Post 20
Door hinge bolts (3 different manufacturers) - Post 20
Door key lock and gaskets - Post 809
Door key lock original vs. Service replacements - Post 1379
Door latch originals and door latch rod covers - Post 508 & 1053
Door latches painted – Post 1068
Door light switches - original - Post 700
Door lock original push knob – Post 365
Door mirror taking glass out for re-chrome - Post 585
Door mirror original date code 10-DMI-7 - Post 43
Door mirror original restored and installed – Post 1161
Door rubber bumpers - original - Post 700
Door rubber bumpers (NOS) #4721222 – Post 1094
Door sill plates (NOS) with rivets purchased 1979 - Post 810
Door weather-stripping (NOS) – Post 1134
Door window cranks - Post 540 & 567
Door window cranks assembly after re-chrome – Post 881
Door window fuzzies - Post 1077
Drag link original blued - Post 208
Driveshaft paint markings after Evaporust bath - Post 271
Driveshaft paint markings installed – Post 1409
Driveshaft yoke - paint markings - Post 285 & restored Post 426
Driveshaft restored - Post 322
Drum brake hardware - Post 393 & 395
Drum brake wheel cylinders rear - Post 276
Emblems - fender (NOS) 302, bezel and Camaro – Post 959
Emblems - fender original 302 emblems Eddie had taken off car late 60’s – Post 1317
Emblems - trunk lid Fisher #7752901 - Post 1361
Emergency brake cables - Post 401 & hardware 413
Emissions sticker radiator support – Post 1187, 1188, Post 1238
Engine assembly #3830711 head gaskets, pistons, heads, etc. - Post 506
Engine cam, Crane blueprint specification – Post 1130
Engine compartment original ‘68Z (cook_dw) with air cowl plenum - Post 1004
Engine dress up starting - Post 582 & 608
Engine dyno sheet - Post 531
Engine head bolts original - Post 481
Engine mount #6258154 (not correct purchased 1979) - Post 484
Engine mount correct - Post 500 & Post 505
Engine mount hardware original vs. reproduction - Post 482 & 539
Engine oil pan drain hole “TR” bolt - Post 43
Engine painting at plant picture - Post 646
Engine piston original - Post 412
Engine stamping pictures - Post 168
Engine with transmission going in subframe - Post 735 & 736
Exhaust Gardner installation – Post 1168
Exhaust pipe hanger rear originals - Post 554
Fan shrouds, original vs. (NOS) Service replacement – Post 1087
Fender side marker bezel differences – Post 70 & 71
Flasher signal Stat 175 - Post 783 & 785
Fuel pump AC40524 used on ‘68 Z/28’s – Post 1260
Fuel pump original bolts - Post 201
Fuel pump plate, black or bare metal – Post 872
Fuses color coded – Post 1294
Gas cap locking (NOS) #986970 – Post 62
Gas cap originals riveted handle - Post 373
Gas cap originals riveted handle look added to NOS cap - Post 546
Gas pedal #3920296 review - Post 365
Gas line clip #3881339 clip with screw #3886522 & #3841230 - Post 586
Gas line clip #3881339 install how to - Post 608
Gas tank anti-rattle strips – originals - Post 269 & 1143
Gas tank filler neck cover and phosphate screw – Post 1014
Gas tank filler neck hose and hardware - Post 298 & 300
Gas tank filler neck hose hardware clamps original - Post 302
Gas tank filler neck installation - Post 1014
Gas tank installed – Post 1143
Gas tank sending unit original vs. #19179532 Service replacement - Post 520
Gas tank strap - original semi-gloss black - Post 251
Gas tank strap and bolts with nuts - Post 268
Gas tank strap original bolt vs. reproduction - Post 275 & Post 425
Glass quarter windows and trim – Post 1053
Glass windshield with rear glass and trim – Post 1127 & 1128
Glove box door Camaro script removal and parts – Post 905
Grille end bracket installation with rivet – Post 1144
Grille installation – Post 1117 & 1152
Grille matched for original look gray and painted – Post 1144
Grille prep for paint (NOS purchased 1983) - Post 957
Ground at gauge cluster housing (speedo/tach) - Post 1139
Ground strap screws #9420415 - Post 595
Hardware #124829 Z-bar nut – Post 1315
Hardware #272876 shackle nut phosphate – Post 1301
Hardware #3831892 - Post 427
Hardware #3873852 beside #3747933 carb studs – Post 1013
Hardware #3933052 10-24X1/2” AMK correct – Post 945
Hardware #5959164 rear tail-light screws – Post 980
Hardware #9418962 console screw – Post 1043
Hardware #9420415 ground strap screws – Post 595
Hardware #9780422 three different suppliers - Post 748
Hardware and fastener list by part number - Post 1253
Hardware- fender clips - Post 302
Hardware spoiler – Post 1087 (Found later to be acorn nuts!)
Header gaskets made as GM originals - Post 508 & 1301
Header GM hardware - Post 1308 & 1309
Headers-Kustom reproduction - Post 263 & coated Post 279
Headlight buckets original restored – Post 1119
Headlight electrical connectors original - Post 309
Headlight T3 date stamping original – Post 39
Headlight T3 testing - Post 884 & installed Post 1152
Headliner installed - Post 1080
Heater box and core dated 67L - Post 485
Heater hose – Post 995 & NCRS information Post 1042
Heater hose with GM logo picture taken Summer ‘68 (cook_dw) (Note: Heater hose for 68 used GM logo & by early 69 models changed to grooved) - Post 1004
Hood bumpers - original vs. reproduction - Post 1073
Hood hinge #3910668 comparison original to Service replacement - Post 269 & 270
Hood hinge to fender screw differences – Post 1254, 1255 & 1256
Hood hinge and latch restored - Post 361
Hood hinge hardware #9419301 - Post 480
Hood latch parts - Post 256
Horn relay restored - Post 148
Horns restored by horn works - Post 170
Horn screws original zinc - Post 413
Hose clamp original - Post 365
Idler arm original #3917581 and seal #5693027 – before and after - Post 204
Ignition coil bracket original vs. Service replacement - Post 413
Ignition coil comparison - Post 492
Ignition switch - pick it when you have no key – Post 1379
Inner fenders NOS - layout for A-Arm flaps - Post 1020
Inner fenders NOS - drilling for stapling rubber shields & making staples – Post 1045
Intake manifold bolts shouldered and non-shouldered - Post 581
Intake original #3017610 restored - Post 664
Intake oil fill tube cap - original vs. Service replacement - Post 369
Intake thermostat housing – Post 37
Interior bucket seat catch stops restored – Post 1251 & 1261
Interior carpet installation front – Post 735
Interior carpet original tag – Post 4
Interior door panel fuzzies (NOS) vs. reproduction – Post 1143
Interior door panel installation – Post 1156 & 1157
Interior lace vs. reproduction – Post 1191
Interior (NOS) package tray #7666129 – Post 1134
Interior pillar post seals original – Post 349
Interior rear view mirror original restored – Post 1140
Interior sail panels re-glued and installed – Post 1097
Interior seat belts – original - Post 1142
Interior seat belts - original Model 137 vs. Model 177 – Post 1183
Interior seat rear - Al Knoch issues – Post 1191
Interior seat rear - correct burlap and spring & view from trunk – Post 1251
Interior seat rear - correct original cover installed – Post 1297
Interior seat track hardware original restored – Post 1191
Interior sill plates (NOS) purchased 1979 with rivets – Post 1191 & 1232
Interior window - vent knob repair and put back on after chroming – Post 1303
Judging Bow Tie results – Post 1232 & 1238
Keys-Briggs & Stratton - Post 304 & 1249
Kick panels OER installed - Post 709
Leaf spring bushing - front #362108 - Post 441
Leaf spring comparison original vs. reproduction and installed - Post 441
Leaf spring hardware original - Post 402 & Post 441
Leaf spring J-nuts safety issue - Post 465
Leaf spring - rubber #3908370 for spring eye - Post 186 & Post 441
Leaf spring shackle plates restored - Post 442
Leaf spring stampings - Post 201
License light fixture removed - Post 275
License light fixture original restored vs. Service replacement - Post 667
Mirror - rear view original and Paragon replacement - Post 214
Muncie shift ball with Knob (NOS) #3922525 – Post 1138
Muncie shifter boot retainer ring screws – Post 1077
Muncie shifter bracket original bolts installed – Post 1408
Muncie shifter nuts with washers attach rods to transmission - Post 748 & 750
Muncie shifter original Niagara orange cap - Post 378
Muncie shifter original handle re-chromed - Post 374
Muncie shifter rods BB vs. SBC - Post 409
Muncie shifter with console (under cover) – Post 1020
Muncie shifter with stabilizer bar (Note: there were 3 different stabilizer bars used between engines and transmissions) - Post 385 & 409 & 859
Molding reveal – Post 1077
Nova L78 came home again - Post 674
Oil dip sticks ‘68Z two versions – Post 1041
Oil filter PF-25 original with embossed bottom - Post 328
Oil filter PF-25 and PF29 - Post 666
Oil Filter PF-29 correct for 1968 - NOS vs. Repro – Post 1312
Oil filter stenciling - Post 677 & 680
Oil pan differences original vs. Service replacement - Post 412
Oil pan ready to paint - Post 472
Oil pan splash shield original round hole - Post 412
Oil pressure line and fitting link to CRG – Post 830
Oil pressure line fitting to block – original – Post 845
Oil pressure line fitting installed - Post 902
Oil pressure line routing – Post 1020
Paint – 1st step, Lonny washing to prepare for paint - Post 174
Paint – 2nd pictures of body after wet sand and buff - Post 289 & 290
Paint primer steps – Post 79, 85 & 97
Paint Z/28 stripes layout – Post 1084 & 1087
Paint Z/28 stripes original parts – Post 3 & 963
Paint Z/28 stripes painted on – Post 1144
Parking light bulbs – Post 1146
Parking light fender bezel - Post 373
Parking light grille original housing, lens, screws and gasket - Post 334
Parking light quarter panel installation and bolt up – Post 1014
PCV - ventilation valve spun correct vs. Service replacement - Post 369 & Post 633
Plastic scratch remover “Novus” - Post 634 & 639
Plugs rubber rear quarter original #4805844 - Post 419 and #4802102 Post 590
Plugs rubber rear quarter original installed – Post 979
Quarter window glass and seals original - Post 596
Radiator cap RC-15 original vs. reproduction - Post 369
Radiator cap RC-15 original 68 and 69 restored - Post 508 & 1098
Radiator clutch fan stamped 11 2 67 SC - Post 258
Radiator petcock original ‘Weatherhead Company’ - Post 298 & 1094
Radiator tag original - Post 202 & 1094
Radio speaker AM front original - Post 578
Rag joint - ‘68 original on left ‘67 Corvette right one - Post 140
Rag joint restored - Post 163
Rally wheel DF showing two kinds font - Post 430 & Post 607
Rally wheel paint #1403 Krylon dull aluminum to argent silver - Post 520
Rally wheel with tire micro weights - Post 285 & Post 335
Rally wheel with trim ring and centers (NOS) 1980 – Post 1173
Rally wheel valve stems - Post 566 & Post 575
Rear 12 bolt air vent - original vs. reproduction (nice) – Post 819
Rear 12 bolt bumper rubber and hardware installed - Post 442
Rear 12 bolt stamping BV 1129 G1 - Post 169
Rear 12 bold hardware - #3930052 cushion and installation - Post 445
Rear 12 bolt ring gear dated 11/67 and axles – Post 116
Rear 12 bolt U-bolts - Post 429 & Post 441
Rear 12 bolt yoke - Post 369, with like new slinger - Post 377
Rear glass interior trim painted – Post 979
Roger Dean emblem – Post 848
Rocker panel molding (NOS) – Post 78
Rust Prevention Magic - Post 375
Seal #3921853 and clip (LH) below master cylinder – original – Post 957
Seal #3921853 and clip (LH) below master cylinder installed – Post 963
Seal seamer - cowl - Post 140
Shock absorber rear and cap – Original – Post 979
Shock absorber rear installed picture – Post 1409
Smog pump set-up (not used) - Post 319
Spark plug wire loom - left side - Post 373 & 979
Spark plugs AC43 comparison - Post 300
Speedometer cable CA and FB plug original - Post 510
Speedometer cable clips original - Post 511, 523 & 1408
Spoiler front – Post 1158, 1170 & 1252
Spoiler front screw location with dimensions to AIM for reference – Post 1252
Spoiler front screws – phosphate – Post 1301
Spoiler rear installed with acorn nuts –Post 1170
Spoiler rear acorn nuts original 7/16 inch height – Post 1330
Stabilizer link hardware differences - Post 195
Stampings body panel parts - Post 138
Starter brace original vs. Service replacement - Post 565
Starter painting per John Pirkle Jr. and NCRS link - Post 627
Starter solenoid cap brown vs. black - Post 630
Steering arms and knuckles #3902519 and #3902520 original markings - Post 155 & Post 156
Steering box nut and washer – phosphate – Post 1302 & 1407
Steering box original with RSC cover bolts - Post 253
Steering box original with date code 3567 (12/22/67) - Post 594
Steering knuckles restored with paint markings - Post 262
Steering rag joint installed - Post 800
Steering tie rods – Post 1176
Steering wheel original – Post 936 & 937
Subframe – Post 105 & 107
Subframe assembly - Post 287
Subframe body mount - #3901361, #3928380 and #1408366 – Post 158
Subframe body mount washer #3901365 - Post 365
Subframe bolts originals restored - Post 252
Subframe bolt and washers as installed - Post 795 & 1409
Subframe mount #3 taping - Post 262 & 1301
Subframe mounts to body and install - Post 752
Subframe painted - Post 138 & Post 140
Sunvisor brackets original re-chromed - Post 374
Suspension and steering component finished pictures – Post 1407 & 1408
Tachometer Tic-Toc-Tach original - Post 279 & Post 335
Taillight bezel gaskets - original - Post 275
Taillight bezel installed – Post 1014
Taillight bezels re-chromed - Post 374
Taillight bezels restored - Post 513
Taillight bulb connectors original - Post 310
Taillight lens wick, seals and screws #5959164 – Post 980
Temperature sending units (three types) – Post 1098
Temperature sending units (original type) and connector – Post 1111
Timing gear cover original bolts - Post 201
Tire - Goodyear Wide Tread January ‘68 dated - Post 535
Tire pressure sticker - original on glove box door – Post 52 & 905
Tire jack shaft re-plated - Post 249
Tire valve stem length and “Schrader” cap - Post 535
Transmission bell housing original (Note paint & yellow crayon mark) – Post 36
Transmission cross-member Muncie shifter - Post 302 & & 361
Transmission drain plug “W”- Post 45
Transmission rebuild – Post 126
Transmission reverse back--up light switch cover plate - original with stamping – Post 902
Transmission reverse back-up light switch holder #3864296 original - Post 397
Transmission reverse back-up light wiring to cowl connector - Post 726
Transmission shift levers and AIM back-up switch - Post 714
Transmission stamping P8T29 December 29, 1967 – Post 45 & 231
Trim - wheel well and rocker spears (#3904540) installed – Post 1151
Trunk bumper jack shaft re-plated – Post 249 & 1187
Trunk bumper jack UN hook – Post 1187
Trunk gas tank neck cover - original - Post 251
Trunk lid Posi glued and jacking instructions on – Post 1161
Trunk lid - removal of washer marks - Post 350
Trunk lid rubber bumper #4721222 – Post 86
Trunk lock retainer and screw – Post 1048, 1053 & 1065
Trunk shock cap original vs. reproduction - Post 423
Trunk spare tire holder and original wing nut vs. reproduction – Post 1187
Trunk spatter 1st attempt (wrong) - Post 243
Trunk spatter 2nd attempt (correct) – Post 964
Trunk weatherstripping - original type with string and later NOS – Post 1098
Trunk wiring harness clip installed – Post 1068
U-Joints originals – Post 861
Upper control arm washer - original to reproduction - Post 241
Valve cover grommet #14091870 - Post 626
Valve covers (NOS) purchased 1979 - Post 483
Vin hidden cowl – painted - Post 10 & 150
Voltage regulator restored dated 7M - Post 148
Water pump by-pass hose being painted - Post 941 & 964
Water pump original hose fittings re-plated - Post 249
Water pump Zinc fittings ground strap with heater hose elbow - Post 1309
Wheel house preparation – Post 106
Wheel stud - original - Post 182
Window sticker reproduction – Post 1261 & 1265
Windshield washer bottle cap and hose original – Post 327 & 1119
Windshield washer pump original #4912365 vs. later #4919332 - Post 225
Windshield washer pump restored - Post 270
Wiper arm blades correct -Post 886, 895, 898 & 899
Wiper arm mechanism before after Evaporust - Post 258
Wiper motor original dated 35167 - Post 520
Wiper motor original #5045441 and how to test – Post 900
Wiper motor original #5045441 and stenciled date code – Post 902
Wiring harness - engine connector (has wrong yellow zinc bolt) - Post 809
Wiring harness - engine connector with correct clear zinc bolt – Post 820
Wiring harness engine - original alternator boot, push in pins black - Post 344
Wiring harness - engine - original push in plugs black – Post 1119
Wiring harness junction block - original restored - Post 366
Wiring harness - trunk original vs. reproduction - Post 311
Wiring harness - trunk installation of clips – Post 1014
Wiring harness - trunk ground screw Zinc – Post 1014
Wiring harness - trunk ready for installation - Post 501
For those of us married, we know how important that is, right? :yes:Here is the car in the late 70's!
The Z just before it left for East Coast Musclecars!
Chick’s Team Camaro Build Thread - Time for Another 68 Z/28 to be Restored
Table of Contents
68Z-1970 Picture of Eddie Meadows (orig. owner) – Post 32
68Z-1983 Purchase - what I brought home in pieces - Post 1244
68Z-2010 How it looked from lacquer paint job in mid-80’s - Post 1
68Z-2016 Saw some sunlight for 1st time since 1979 – Post 1263
68Z-2017 Reunited with original owner Eddie Meadows – Post 1317
68Z-2017 Picture taking for Hemmings Muscle Machines – Post 1348
A-Arm assembly painted - Post 272
A-Arm rubber flap shields-drilling NOS inner fenders – Post 1045
A-Arm rubber flap shields making staples – Post 1045
A-Arm rubber material with cords – Post 971
A-Arm shims - Post 674
A-Arm upper rubber bumper #384220 - Post 214
Air cleaner connector #3923260 to valve cover - Post 592
Air cowl plenum air filter A226CW original vs. later - Post 236 & 241
Air cowl plenum air filter cheap replacement – Post 1191
Air cowl plenum carb stud – Post 1013
Air cowl plenum installed – Post 1191
Air cowl plenum original installation – Post 1011
Air cowl plenum original seal – Post 1013
Alternator - after restoration original dated 7H10 - Post 148
Alternator - before restoration original dated 7H10 – Post 46
Alternator brackets - comparing original GT stamp to reproduction stamp - Post 160
Alternator bracket to header and alternator installation - Post 795
Alternator bracket alignment front vs. rear on alternator - Post 800
Alternator bracket alignment rear of alternator vintage picture - Post 804 & 806
Alternator wiring boot original - Post 344
Aluminum restoration, intake and distributor – Post 128
Assembly of car - rear in subframe in front - Post 454
Assembly of cowl (Firewall) and under dash list – Post 839
Assembly of fenders and front end - 1069 & 1073
Astro ventilation parts and info - 764
Ball joints riveted - Post 160
Battery cable negative clips #3857706 - Post 609 & 612
Battery cable negative clips #3857706 located on frame - Post 621
Battery cable negative clips - how to install - Post 682 & 687
Battery ground for Y55 - location and hardware – Post 1191
Battery hold down clamp bolt - original with 0.87 inch diameter washer - Post 1293
Battery hold down clamp NOS correct piece – Post 860
Battery hold down clamp original vs. Service replacement- Post 366 & Post 490
Battery hold down clamp original dip painted and stampings – Post 1293
Battery hold down clamp painted original survivors (3) - Post 511
Battery hold down clamp restored and bolt – Post 1183
Battery tray – Post 1273, 1275, 1276, 1280, 1281, 1283 & 1287
Battery tray continued – Post 1291 & 1292
Battery tray continued - how to make tab correct - Post 1304
Battery Y55 NOS purchased 1983 (no Energizer script) – Post 1183
Battery Y55 NOS early 70’s vintage with Energizer script- Post 1261
Battery Y55 - How to gut – Post 1394 & 1396
Bezels - Side marker lights painting grooves black – Post 959
Body and components media blasted to bare metal – Post 8, 9 & 10
Body rubber flap in rear quarter housings - originals - Post 196
Body work – Post 53, 59, 61, 65, 69 & 98
Body work continued – Post 106 & 113
Brake booster hose bracket-original vs. reproduction - Post 269
Brake booster restored and hardware - Post 155
Brake booster valve comparisons original to later types – Post 814
Brake booster valve comparisons original to newer reproduction found – Post 1306 & 1309
Brake booster valve and seal #546180 both original - Post 607
Brake booster valve and seal with original clamp installed – Post 902
Brake clutch pedal assembly restoration - Post 410
Brake drum internal components and stamping - Post 258
Brake drum paint for components - close match - Post 262
Brake drum shoes and assembly - Post 486
Brake emergency cables with hardware installed – Post 1409
Brake hose rubber U-shaped clips - original to reproduction - Post 182 & Post 259
Brake hose rear original - Post 280 & 302
Brake line and hardware installed pictures – Post 1176
Brake line clips and hardware (note - ignore bluing for ’68) - Post 524
Brake line clips and hardware by part number in AIM - Post 541, 543 & 545
Brake line clips and hardware by part number in AIM - Post 587
Brake line rear bracket original vs. reproduction - Post 416
Brake line rear bracket with bolt attached to 12 bolt - Post 448
Brake master cylinder (found out later a re-stamp) – Post 129 & 796
Brake master cylinder and booster NOS 5/31/68 – Post 851
Brake master cylinder WT original vs. re-stamp – Post 1362
Brake master cylinder WT original rebuilt and valve with distribution block – Post 1365
Brake system directional block and valve restoration – Post 852
Brake system valve nut re-face (Note valve nut should be phosphate for ‘68, clear zinc for ’69) – Post 856
Bucket seat rail for seat in and out - Post 304
Bumper front installation – Post 1161
Bumper guards NOS – Post 114
Bumper rear NOS guards and installation – Post 1151
Bumper rear license plate light Bracket installation and light differences – Post 1146
Car Show: 11/2016 MCACN - Celebrity Pick Award winner – Post 1267
Car Show: 12/2016 East Coast Indoor Nationals December 2016 - Two awards – Post 1272
Car Show: 06/2017 Camaro Nationals, Gold – Post 1317
Car Show: 06/2017 Camaro Nationals judging demerits – Post 1329 & 1330
Car Show: 06/2017 Camaro Nationals judging demerits – Post 1349
Car Show: 06/2017 Camaro Nationals judging demerits – Post 1355 & 1360
Car Show: 11/2018 MCACN 999/1000 and Platinum Pick best stock Chevrolet – Post 1382
Car Show: 06/2019 AACA Senior award – Post 1398
Carb dated 7A1 List 4053 – Post 68
Carb manifold stud – Post 1087, Post 1111 & 1119
Carb manifold stud information (Stan NCRS judge) – Post 1189
Carb stud original ‘68Z - Post 592 & 1011
Car cover (have 4 of these) no longer available – Post 1157
Chromed original items - Post 757
Clutch bellcrank lower push rod - Post 791
Clutch fork #3892632 and spring - Post 590
Clutch fork hardware and GM number list - Post 683
Clutch fork spring and rod attachment issue with headers – Post 823
Clutch fork spring and rod attachment issue with headers fixed – Post 960
Coil spring tag Skip’s ‘68Z survivor - Post 540
Console gages original - Post 279
Console restoration pictures + (part numbers) and installed – Post 1138
Console special nuts #3792287 - Post 691
Cowl insulation under dash pad (NOS) - purchased 1979 - Post 414 & 419
Cowl insulation under dash pad (NOS) - purchased 1979 restored - Post 449
Cowl insulation under dash pad rubber plugs original #3868790 - Post 595
Cowl painted black - before paint Post 140 & after paint - Post 150
Cowl painted butternut yellow blend in - Post 243
Cowl panel seal #3927464 – Post 963
Cowl panel - Z28 stripe dimensions – original - Post 3 & 963
Cowl picture showing locations clips, lines, speedo, oil, grounds, etc. - Post 719
Cowl reverse backup light wiring to cowl connector - Post 726
Cowl seal #3927464 – Post 62
Cowl stampings PTB Post 692 & 698 (green)
Dash heater and defroster control panel restoration original - Post 775
Dash installed – Post 1111
Dealership script, Roger Dean added to car – Post 1265
Dimmer switch grommet original - Post 745
Disc brake caliper original 4 piston - Post 163 & painted Post 404
Disc brake distribution block and pressure regulation valve - Post 186
Disc brake hose bracket - Post 160
Disc brake hoses (NOS) - stenciled - Post 351
Disc brake mounting plate original re-plated - Post 249
Disc brake shoe kit #5470879 - Post 429
Disc brake pressure regulation valve ‘68 to ’69 – Post 877 & 880
Distributor cap D308/D308R - Post 594
Distributor original #1111266 dated 7A25 - Post 52 & 664
Distributor vacuum lines - Post 581
Door arm rest pads, original vs. PUI – Post 1080
Door glass hardware – Post 1053
Door handle gaskets (NOS) #1154551 - Post 377
Door handle original thickness vs. other years - Post 326
Door handle re-chromed and #9709600 push button - Post 374
Door handle ready for installation - Post 700
Door hinge area painted – Post 20
Door hinge bolts (3 different manufacturers) - Post 20
Door key lock and gaskets - Post 809
Door key lock original vs. Service replacements - Post 1379
Door latch originals and door latch rod covers - Post 508 & 1053
Door latches painted – Post 1068
Door light switches - original - Post 700
Door lock original push knob – Post 365
Door mirror taking glass out for re-chrome - Post 585
Door mirror original date code 10-DMI-7 - Post 43
Door mirror original restored and installed – Post 1161
Door rubber bumpers - original - Post 700
Door rubber bumpers (NOS) #4721222 – Post 1094
Door sill plates (NOS) with rivets purchased 1979 - Post 810
Door weather-stripping (NOS) – Post 1134
Door window cranks - Post 540 & 567
Door window cranks assembly after re-chrome – Post 881
Door window fuzzies - Post 1077
Drag link original blued - Post 208
Driveshaft paint markings after Evaporust bath - Post 271
Driveshaft paint markings installed – Post 1409
Driveshaft yoke - paint markings - Post 285 & restored Post 426
Driveshaft restored - Post 322
Drum brake hardware - Post 393 & 395
Drum brake wheel cylinders rear - Post 276
Emblems - fender (NOS) 302, bezel and Camaro – Post 959
Emblems - fender original 302 emblems Eddie had taken off car late 60’s – Post 1317
Emblems - trunk lid Fisher #7752901 - Post 1361
Emergency brake cables - Post 401 & hardware 413
Emissions sticker radiator support – Post 1187, 1188, Post 1238
Engine assembly #3830711 head gaskets, pistons, heads, etc. - Post 506
Engine cam, Crane blueprint specification – Post 1130
Engine compartment original ‘68Z (cook_dw) with air cowl plenum - Post 1004
Engine dress up starting - Post 582 & 608
Engine dyno sheet - Post 531
Engine head bolts original - Post 481
Engine mount #6258154 (not correct purchased 1979) - Post 484
Engine mount correct - Post 500 & Post 505
Engine mount hardware original vs. reproduction - Post 482 & 539
Engine oil pan drain hole “TR” bolt - Post 43
Engine painting at plant picture - Post 646
Engine piston original - Post 412
Engine stamping pictures - Post 168
Engine with transmission going in subframe - Post 735 & 736
Exhaust Gardner installation – Post 1168
Exhaust pipe hanger rear originals - Post 554
Fan shrouds, original vs. (NOS) Service replacement – Post 1087
Fender side marker bezel differences – Post 70 & 71
Flasher signal Stat 175 - Post 783 & 785
Fuel pump AC40524 used on ‘68 Z/28’s – Post 1260
Fuel pump original bolts - Post 201
Fuel pump plate, black or bare metal – Post 872
Fuses color coded – Post 1294
Gas cap locking (NOS) #986970 – Post 62
Gas cap originals riveted handle - Post 373
Gas cap originals riveted handle look added to NOS cap - Post 546
Gas pedal #3920296 review - Post 365
Gas line clip #3881339 clip with screw #3886522 & #3841230 - Post 586
Gas line clip #3881339 install how to - Post 608
Gas tank anti-rattle strips – originals - Post 269 & 1143
Gas tank filler neck cover and phosphate screw – Post 1014
Gas tank filler neck hose and hardware - Post 298 & 300
Gas tank filler neck hose hardware clamps original - Post 302
Gas tank filler neck installation - Post 1014
Gas tank installed – Post 1143
Gas tank sending unit original vs. #19179532 Service replacement - Post 520
Gas tank strap - original semi-gloss black - Post 251
Gas tank strap and bolts with nuts - Post 268
Gas tank strap original bolt vs. reproduction - Post 275 & Post 425
Glass quarter windows and trim – Post 1053
Glass windshield with rear glass and trim – Post 1127 & 1128
Glove box door Camaro script removal and parts – Post 905
Grille end bracket installation with rivet – Post 1144
Grille installation – Post 1117 & 1152
Grille matched for original look gray and painted – Post 1144
Grille prep for paint (NOS purchased 1983) - Post 957
Ground at gauge cluster housing (speedo/tach) - Post 1139
Ground strap screws #9420415 - Post 595
Hardware #124829 Z-bar nut – Post 1315
Hardware #272876 shackle nut phosphate – Post 1301
Hardware #3831892 - Post 427
Hardware #3873852 beside #3747933 carb studs – Post 1013
Hardware #3933052 10-24X1/2” AMK correct – Post 945
Hardware #5959164 rear tail-light screws – Post 980
Hardware #9418962 console screw – Post 1043
Hardware #9420415 ground strap screws – Post 595
Hardware #9780422 three different suppliers - Post 748
Hardware and fastener list by part number - Post 1253
Hardware- fender clips - Post 302
Hardware spoiler – Post 1087 (Found later to be acorn nuts!)
Header gaskets made as GM originals - Post 508 & 1301
Header GM hardware - Post 1308 & 1309
Headers-Kustom reproduction - Post 263 & coated Post 279
Headlight buckets original restored – Post 1119
Headlight electrical connectors original - Post 309
Headlight T3 date stamping original – Post 39
Headlight T3 testing - Post 884 & installed Post 1152
Headliner installed - Post 1080
Heater box and core dated 67L - Post 485
Heater hose – Post 995 & NCRS information Post 1042
Heater hose with GM logo picture taken Summer ‘68 (cook_dw) (Note: Heater hose for 68 used GM logo & by early 69 models changed to grooved) - Post 1004
Hood bumpers - original vs. reproduction - Post 1073
Hood hinge #3910668 comparison original to Service replacement - Post 269 & 270
Hood hinge to fender screw differences – Post 1254, 1255 & 1256
Hood hinge and latch restored - Post 361
Hood hinge hardware #9419301 - Post 480
Hood latch parts - Post 256
Horn relay restored - Post 148
Horns restored by horn works - Post 170
Horn screws original zinc - Post 413
Hose clamp original - Post 365
Idler arm original #3917581 and seal #5693027 – before and after - Post 204
Ignition coil bracket original vs. Service replacement - Post 413
Ignition coil comparison - Post 492
Ignition switch - pick it when you have no key – Post 1379
Inner fenders NOS - layout for A-Arm flaps - Post 1020
Inner fenders NOS - drilling for stapling rubber shields & making staples – Post 1045
Intake manifold bolts shouldered and non-shouldered - Post 581
Intake original #3017610 restored - Post 664
Intake oil fill tube cap - original vs. Service replacement - Post 369
Intake thermostat housing – Post 37
Interior bucket seat catch stops restored – Post 1251 & 1261
Interior carpet installation front – Post 735
Interior carpet original tag – Post 4
Interior door panel fuzzies (NOS) vs. reproduction – Post 1143
Interior door panel installation – Post 1156 & 1157
Interior lace vs. reproduction – Post 1191
Interior (NOS) package tray #7666129 – Post 1134
Interior pillar post seals original – Post 349
Interior rear view mirror original restored – Post 1140
Interior sail panels re-glued and installed – Post 1097
Interior seat belts – original - Post 1142
Interior seat belts - original Model 137 vs. Model 177 – Post 1183
Interior seat rear - Al Knoch issues – Post 1191
Interior seat rear - correct burlap and spring & view from trunk – Post 1251
Interior seat rear - correct original cover installed – Post 1297
Interior seat track hardware original restored – Post 1191
Interior sill plates (NOS) purchased 1979 with rivets – Post 1191 & 1232
Interior window - vent knob repair and put back on after chroming – Post 1303
Judging Bow Tie results – Post 1232 & 1238
Keys-Briggs & Stratton - Post 304 & 1249
Kick panels OER installed - Post 709
Leaf spring bushing - front #362108 - Post 441
Leaf spring comparison original vs. reproduction and installed - Post 441
Leaf spring hardware original - Post 402 & Post 441
Leaf spring J-nuts safety issue - Post 465
Leaf spring - rubber #3908370 for spring eye - Post 186 & Post 441
Leaf spring shackle plates restored - Post 442
Leaf spring stampings - Post 201
License light fixture removed - Post 275
License light fixture original restored vs. Service replacement - Post 667
Mirror - rear view original and Paragon replacement - Post 214
Muncie shift ball with Knob (NOS) #3922525 – Post 1138
Muncie shifter boot retainer ring screws – Post 1077
Muncie shifter bracket original bolts installed – Post 1408
Muncie shifter nuts with washers attach rods to transmission - Post 748 & 750
Muncie shifter original Niagara orange cap - Post 378
Muncie shifter original handle re-chromed - Post 374
Muncie shifter rods BB vs. SBC - Post 409
Muncie shifter with console (under cover) – Post 1020
Muncie shifter with stabilizer bar (Note: there were 3 different stabilizer bars used between engines and transmissions) - Post 385 & 409 & 859
Molding reveal – Post 1077
Nova L78 came home again - Post 674
Oil dip sticks ‘68Z two versions – Post 1041
Oil filter PF-25 original with embossed bottom - Post 328
Oil filter PF-25 and PF29 - Post 666
Oil Filter PF-29 correct for 1968 - NOS vs. Repro – Post 1312
Oil filter stenciling - Post 677 & 680
Oil pan differences original vs. Service replacement - Post 412
Oil pan ready to paint - Post 472
Oil pan splash shield original round hole - Post 412
Oil pressure line and fitting link to CRG – Post 830
Oil pressure line fitting to block – original – Post 845
Oil pressure line fitting installed - Post 902
Oil pressure line routing – Post 1020
Paint – 1st step, Lonny washing to prepare for paint - Post 174
Paint – 2nd pictures of body after wet sand and buff - Post 289 & 290
Paint primer steps – Post 79, 85 & 97
Paint Z/28 stripes layout – Post 1084 & 1087
Paint Z/28 stripes original parts – Post 3 & 963
Paint Z/28 stripes painted on – Post 1144
Parking light bulbs – Post 1146
Parking light fender bezel - Post 373
Parking light grille original housing, lens, screws and gasket - Post 334
Parking light quarter panel installation and bolt up – Post 1014
PCV - ventilation valve spun correct vs. Service replacement - Post 369 & Post 633
Plastic scratch remover “Novus” - Post 634 & 639
Plugs rubber rear quarter original #4805844 - Post 419 and #4802102 Post 590
Plugs rubber rear quarter original installed – Post 979
Quarter window glass and seals original - Post 596
Radiator cap RC-15 original vs. reproduction - Post 369
Radiator cap RC-15 original 68 and 69 restored - Post 508 & 1098
Radiator clutch fan stamped 11 2 67 SC - Post 258
Radiator petcock original ‘Weatherhead Company’ - Post 298 & 1094
Radiator tag original - Post 202 & 1094
Radio speaker AM front original - Post 578
Rag joint - ‘68 original on left ‘67 Corvette right one - Post 140
Rag joint restored - Post 163
Rally wheel DF showing two kinds font - Post 430 & Post 607
Rally wheel paint #1403 Krylon dull aluminum to argent silver - Post 520
Rally wheel with tire micro weights - Post 285 & Post 335
Rally wheel with trim ring and centers (NOS) 1980 – Post 1173
Rally wheel valve stems - Post 566 & Post 575
Rear 12 bolt air vent - original vs. reproduction (nice) – Post 819
Rear 12 bolt bumper rubber and hardware installed - Post 442
Rear 12 bolt stamping BV 1129 G1 - Post 169
Rear 12 bold hardware - #3930052 cushion and installation - Post 445
Rear 12 bolt ring gear dated 11/67 and axles – Post 116
Rear 12 bolt U-bolts - Post 429 & Post 441
Rear 12 bolt yoke - Post 369, with like new slinger - Post 377
Rear glass interior trim painted – Post 979
Roger Dean emblem – Post 848
Rocker panel molding (NOS) – Post 78
Rust Prevention Magic - Post 375
Seal #3921853 and clip (LH) below master cylinder – original – Post 957
Seal #3921853 and clip (LH) below master cylinder installed – Post 963
Seal seamer - cowl - Post 140
Shock absorber rear and cap – Original – Post 979
Shock absorber rear installed picture – Post 1409
Smog pump set-up (not used) - Post 319
Spark plug wire loom - left side - Post 373 & 979
Spark plugs AC43 comparison - Post 300
Speedometer cable CA and FB plug original - Post 510
Speedometer cable clips original - Post 511, 523 & 1408
Spoiler front – Post 1158, 1170 & 1252
Spoiler front screw location with dimensions to AIM for reference – Post 1252
Spoiler front screws – phosphate – Post 1301
Spoiler rear installed with acorn nuts –Post 1170
Spoiler rear acorn nuts original 7/16 inch height – Post 1330
Stabilizer link hardware differences - Post 195
Stampings body panel parts - Post 138
Starter brace original vs. Service replacement - Post 565
Starter painting per John Pirkle Jr. and NCRS link - Post 627
Starter solenoid cap brown vs. black - Post 630
Steering arms and knuckles #3902519 and #3902520 original markings - Post 155 & Post 156
Steering box nut and washer – phosphate – Post 1302 & 1407
Steering box original with RSC cover bolts - Post 253
Steering box original with date code 3567 (12/22/67) - Post 594
Steering knuckles restored with paint markings - Post 262
Steering rag joint installed - Post 800
Steering tie rods – Post 1176
Steering wheel original – Post 936 & 937
Subframe – Post 105 & 107
Subframe assembly - Post 287
Subframe body mount - #3901361, #3928380 and #1408366 – Post 158
Subframe body mount washer #3901365 - Post 365
Subframe bolts originals restored - Post 252
Subframe bolt and washers as installed - Post 795 & 1409
Subframe mount #3 taping - Post 262 & 1301
Subframe mounts to body and install - Post 752
Subframe painted - Post 138 & Post 140
Sunvisor brackets original re-chromed - Post 374
Suspension and steering component finished pictures – Post 1407 & 1408
Tachometer Tic-Toc-Tach original - Post 279 & Post 335
Taillight bezel gaskets - original - Post 275
Taillight bezel installed – Post 1014
Taillight bezels re-chromed - Post 374
Taillight bezels restored - Post 513
Taillight bulb connectors original - Post 310
Taillight lens wick, seals and screws #5959164 – Post 980
Temperature sending units (three types) – Post 1098
Temperature sending units (original type) and connector – Post 1111
Timing gear cover original bolts - Post 201
Tire - Goodyear Wide Tread January ‘68 dated - Post 535
Tire pressure sticker - original on glove box door – Post 52 & 905
Tire jack shaft re-plated - Post 249
Tire valve stem length and “Schrader” cap - Post 535
Transmission bell housing original (Note paint & yellow crayon mark) – Post 36
Transmission cross-member Muncie shifter - Post 302 & & 361
Transmission drain plug “W”- Post 45
Transmission rebuild – Post 126
Transmission reverse back--up light switch cover plate - original with stamping – Post 902
Transmission reverse back-up light switch holder #3864296 original - Post 397
Transmission reverse back-up light wiring to cowl connector - Post 726
Transmission shift levers and AIM back-up switch - Post 714
Transmission stamping P8T29 December 29, 1967 – Post 45 & 231
Trim - wheel well and rocker spears (#3904540) installed – Post 1151
Trunk bumper jack shaft re-plated – Post 249 & 1187
Trunk bumper jack UN hook – Post 1187
Trunk gas tank neck cover - original - Post 251
Trunk lid Posi glued and jacking instructions on – Post 1161
Trunk lid - removal of washer marks - Post 350
Trunk lid rubber bumper #4721222 – Post 86
Trunk lock retainer and screw – Post 1048, 1053 & 1065
Trunk shock cap original vs. reproduction - Post 423
Trunk spare tire holder and original wing nut vs. reproduction – Post 1187
Trunk spatter 1st attempt (wrong) - Post 243
Trunk spatter 2nd attempt (correct) – Post 964
Trunk weatherstripping - original type with string and later NOS – Post 1098
Trunk wiring harness clip installed – Post 1068
U-Joints originals – Post 861
Upper control arm washer - original to reproduction - Post 241
Valve cover grommet #14091870 - Post 626
Valve covers (NOS) purchased 1979 - Post 483
Vin hidden cowl – painted - Post 10 & 150
Voltage regulator restored dated 7M - Post 148
Water pump by-pass hose being painted - Post 941 & 964
Water pump original hose fittings re-plated - Post 249
Water pump Zinc fittings ground strap with heater hose elbow - Post 1309
Wheel house preparation – Post 106
Wheel stud - original - Post 182
Window sticker reproduction – Post 1261 & 1265
Windshield washer bottle cap and hose original – Post 327 & 1119
Windshield washer pump original #4912365 vs. later #4919332 - Post 225
Windshield washer pump restored - Post 270
Wiper arm blades correct -Post 886, 895, 898 & 899
Wiper arm mechanism before after Evaporust - Post 258
Wiper motor original dated 35167 - Post 520
Wiper motor original #5045441 and how to test – Post 900
Wiper motor original #5045441 and stenciled date code – Post 902
Wiring harness - engine connector (has wrong yellow zinc bolt) - Post 809
Wiring harness - engine connector with correct clear zinc bolt – Post 820
Wiring harness engine - original alternator boot, push in pins black - Post 344
Wiring harness - engine - original push in plugs black – Post 1119
Wiring harness junction block - original restored - Post 366
Wiring harness - trunk original vs. reproduction - Post 311
Wiring harness - trunk installation of clips – Post 1014
Wiring harness - trunk ground screw Zinc – Post 1014
Wiring harness - trunk ready for installation - Post 501


