Team Camaro Tech banner

'69 Camaro Engine and Suspension Upgrade

48K views 201 replies 18 participants last post by  Widseth  
#1 ·
This is now going to be my second build on this forum and looks like the 2 builds will be done concurrently. My other Camaro is a '67 and the build thread is here;

http://www.camaros.net/forums/showthread.php?t=241665

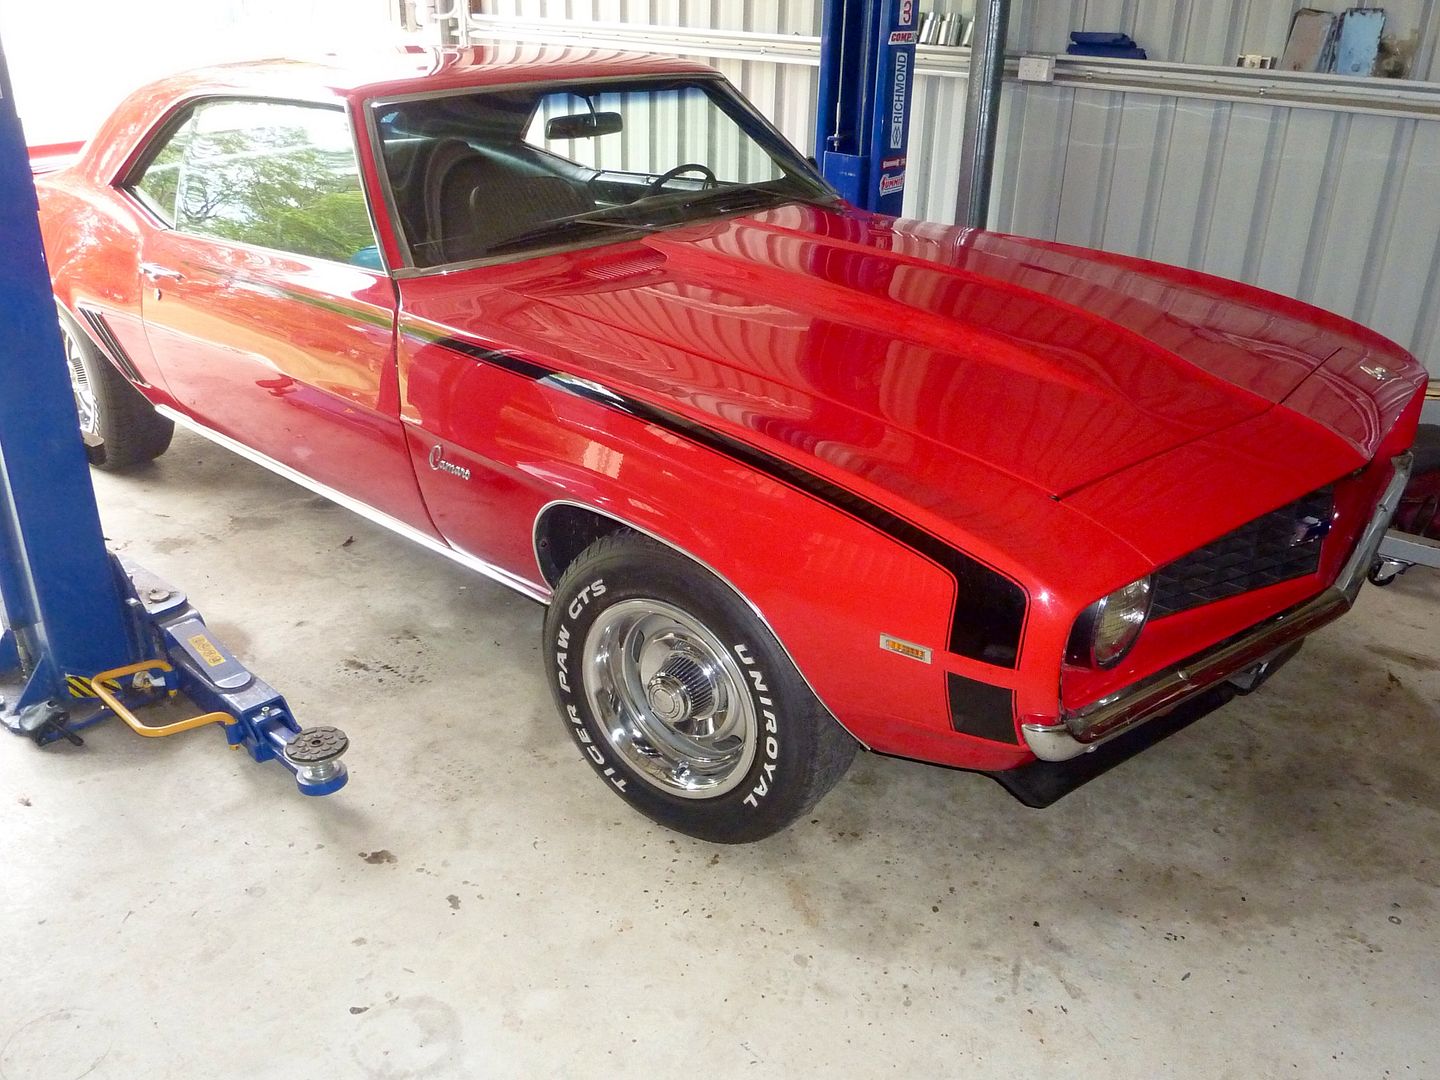
It was never my plan to work on both at once, but I needed the block out this Camaro when I found the block in the '67 was stuffed. It also looks like I won't be able to work on the '67 for a fair chunk of time while its firewall and floor pan are being replaced, giving me an opportunity to work on this Camaro.

Image


Image
 
#2 ·
I'm in Australia and I bought the Camaro from a Mecum auction I went to last year. When I bought it I knew I would have to replace or totally rebuild the engine. It was obvious they had just chucked in whatever they had laying around. I'm guessing there was something in there they wanted to keep.

The suspension is also fairly stock and has some cheap bits and pieces in there, so I knew I wanted to replace a lot of that.

But besides that, it's a very solid car and I will barely touch the interior. It is an V8, X11 car, but not an SS. I will be removing the SS badges. I think the standard blue Bow Tie on the '69 grill is one of the best looking emblems anyway. I won't be touching the paint of any panels either. There is no need to.

So my basic plan so far is;
- Build and install a new engine
- Install a functional cowl induction
- Replace the springs and shocks
- Install all new steering components
- Change to power steering
- Install sound deadening
- Install discs on the front
- Change the diff ratio. It felt like quite low on my first drive (Numerically Low)

I'll elaborate on the above as I have a chance
 
#4 ·
Hi Brian, I got the Camaro from Kissimmee. I can’t agree more about the auctions. They would have to be one of the best car shows on earth and you have such good access to the cars.

To help with the cleaning up of my Camaros, I would love to get back to the States to go to another auction. I would like to look at the original Camaros, or Camaros restored back to original. I’m not one of those people who needs to have the correct stickers and tags like they came out of the factory, but I do like to keep them as close to original as possible within reason.
 
#7 ·
A few photos to show what I am starting with. In these photos A few things had already been removed to check the condition of the block.

The engine is a 350 out of a '77 something or rather. It appeared to be completely untouched and the block will be used in my '67 Camaro. It did have a Holley 650 CFM double pumper installed.

The gearbox is a M21 built in '68.

The Camaro is a factory air-con car, though the air-con has now been removed. I think I will install a Vintage Air-Con system sometime down the track.

Image


Image


Image


Image


The diff is a 8.5" 10 bolt with a posi ( I think it's a posi anyway)

Image
 
#10 ·
This is the build for the engine. It's a 350 and will have a CR of 10.1:1. The block will have the deck machined down to give a quench of 0.04" when using a 0.026" Head Gasket. The rods are 6".

I am having the short block built for me. I would like to build it myself, but considering the money I have spent on parts, I think it might be best to leave this one to the pro’s. I will be building the short block for my '67 myself.

Fuel Injection - MSD Atomic EFI
Intake Manifold - Edelbrock RPM Air-Gap
Heads AFR SB - Chevy Street Aluminum Cylinder Heads 180cc, 65cc
Cam - COMP Cams XR282HR (230/236 @ .050" Lift)
Rocker - Arms COMP Cams Ultra Pro Magnum Rocker Arms, 1.6 Ratio
Followers - COMP Cams High Energy Hydraulic Roller Lifters
Push Rods - COMP Cams Hi-Tech™ Pushrods: 5/16
Timing Chain - COMP Cams Hi-Tech Roller Race Timing Sets
Block - Chevrolet Performance Bare Engine Block, 2-Piece Rear Main Seal
Crank Scat - 4340 Forged
Con Rods - 6” Scat Pro Comp Forged I-Beam
Pistons - DDS Racing GSX-Series Forged Pistons
Rings - Total Seal Maxseal Piston Rings
Bearings - Clevite H-Series
Gaskets – Fel-Pro inc Fel-Pro 0.026” MLS Head Gasket
Oil Pump & Pick-Up - Milodon Oil Pump and Pickup Assembly, High Volume
Windage Tray - Milodon Diamond Stripper
Water Pump - Weiand Action-Plus Aluminium – Long
Damper - Professional Products 8” PowerForce Plus
Alternator - Powermaster 100 Amp Street Alternator
Starter - Powermaster OEM-Style High-Torque
Distributor - MSD Billet & Pro-Billet Distributor - Small Cap
Ignition - MSD 6A Ignition Control
Coil - MSD Blaster Coil
Bolt /Studs - ARP Everywhere Pretty Much


I cleaned up the casting where I could


#11 ·
I have simulated the build on DeskTop Dyno. I would love for this to be accurate!

I was pretty conservative with my inputs too. Though I got the flow rates for the heads off the ARF website, so I don’t know how reliable they are. Though they do say the flows are for when installed on 4.060” bores, which would give slightly better flows than installed on 4.000” bore.

475ft/lb. @ 4000rpm
478hp @ 6000rpm


#12 ·
The ring gear and pinion is a Richmond Gear and the ratio is 4.10:1. The carrier is a Posi too.

My plan for the diff is to rebuild it with a Richmond Gears 3.73:1 ratio ring gear and pinion and to replace all the bearings and seals using a Richmond Gears diff rebuild kit. I will also strip and repaint the housing. Similar to what I'm doing to the diff on the '67.

It's a bit of a shame to rebuild it. It looks like a really nicely built diff but I don't think I could live with the 4.10:1 gearing.

Image


Image


Image


Image


Image
 
#13 ·
Stripping down the subframe.

Image


I cannot get the LH lower control arm out. The frame has been hit slightly near the front bushing and it has trapped the arm.

Image


A bit of a mix and match of parts.

Image


Comparing a power steering arm from Classic Industries with the original non-power steering arm.

Image


Comparing the power steering pitman arm from Classic Industries with the original non-power steering pitman arm.

It just seems to me that long steering arms with a long pitman arm would have a very similar net effect to short steering arms with a short pitman arm?

Image
 
#14 ·
These are my plans for the suspension and steering. I had originally earmarked the Global West Control Arms for the ’67, but I think I will use these on the ‘69 now.

Wheels & Tyres – 15” Mickey Thompson Sportsman S/T Radials on the Camaro Ralley rims that came on the car.
Front Brakes – Standard ’69 Camaro Discs with the addition of the Wilwood D52 Brake Kit
Rear Brakes – Drum (I’m thinking of getting the D154 Rear Park Brake Kit)
Shocks – Bilstein
Control Arms - Global West Tubular Upper Control Arms with Del-a-Lum Bushings, Global West Tubular Lower Control Arms Del-a-Lum Bushings
Front Springs - Global West 1" Drop (S-2)
Rear Springs - Global West 1 1/2" Drop (L-16)
Frame Connectors - Global West Frame Connectors
Sway Bar - Hotchkis 1 1/8" Hollow Sway Bar
Body Mounts - Global West Solid
Steering Box - AGR 16/13:1 Variable Ratio Power Steering Box
Steering Linkage - Proforged Tall Outer Tie Rod Ends. All the other steering components except the Drag Link will be replaced will be replaced with new, including new Power Steering type Pitman and Steering Arms (Except the Drag Link).
 
#15 ·
After stripping out the underside of the car, there were a few areas that could do with a bit of attention. A small amount of surface rust was visible and the coating was looking a bit average and patchy. It might be a long time before I have this type of access again, so I thought I better do something while I had the chance. I would always regret it too if I didn't do something now.

I started by using a heat gun and paint scrapper to get off as much of what ever this stuff is. That actually worked really well. I originally tried a wire wheel on an angle grinder, but it was really slow as this stuff was too soft and thick. The photos don't really show it, but it was really thick everywhere except above the fuel tank.

I've run out of time now, but in a couple of weeks time when I'm back home again, I'll use a wire wheel on the angle grinder to do a final clean up before painting.

Image


Image


Image


Below is the product I'm going to use. It's Wurth Stone Guard. I've used it on one of my other vehicle which is pictured below and was really happy with the results. One of the best things is that there is no spray mist, so I don't have to cover the whole car to protect from overspray.

Image
 
#16 · (Edited)
I've finished stripping the underside of the Camaro. For those who have done this before, I'm sure you can appreciate the amount of time and effort that goes into doing this. It would have been about 10 to 15 hours of solid work. This is now the 3rd car I've done, and it was the hardest and slowest.

I finished the job off with a grinder with a wire wheel and I used a needle scaler for everywhere I couldn't reach with that.

I found the rear frame rails will need replacing due to rust. I'm not going to do it this time around, but I'll be looking to replace them in the years to come. The trunk also has something like a false floor installed on top of the old floor. I will look to correctly repair this at the same time.

I think we all know these projects never end.

You can also just see some of the green paint which is Eastwood's Internal Frame Coating. I pretty much shoved that in any cavity I could.

Image


Image


Image
 
#17 ·
I found the rear frame rails will need replacing due to rust. I'm not going to do it this time around, but I'll be looking to replace them in the years to come. The trunk also has something like a false floor installed on top of the old floor. I will look to correctly repair this at the same time.
Looking great, you have taken it this far why not replace the frame rail rot and floor now?...if you intend on keeping the car it will be less expensive now than in the future.
 
#19 ·
I had problems with the adhesion of the Wurth Stone Guard to wherever I used rust converter, which fortunately I didn't use a heap of. I don't know if I didn't let the converter dry for long enough, if I put it on too thick or it just wasn't compatible. I pulled off the loose coating and then feathered the edges with a wire wheel.

Image


Image
 
#21 ·
I've picked up the short block from the machine shop and it looks good.

A bit of a recap of what it is;

Block - New Chevrolet Performance Bare Block
Crank - Scat 4340 Forged
Con Rods - 6” Scat Pro Comp Forged I-Beam
Pistons - DDS Racing GSX-Series Forged Pistons
Rings - Total Seal Maxseal Piston Rings
Bearings - Clevite H-Series

Image


Image


Image


Image


Unfortunately I won't have the cam until mid January so I've wrapped it back up. I may get a chance to paint the block and oil pan this R&R

Image
 
#22 ·
When dissembling the diff I found the carrier spacers/shims had been rotating, causing metal to be shaved off them. I can not work out how this could be happening, unless the outer race of the the carrier bearings were rotating under the cap?

Image


Image


Image


I cleaned up the casting too.

Image


Obviously focused on the wrong thing there

Image
 
#24 ·
Nice work. I would have done the trunk and frame rails at the same time, since you were that far stripped down. But I understand the cost and time issue. I would not have thought shipping would be that much.

So what is your overall opinion of the car you started with now? Do you think the auction represented the car fairly and let you know all of the issues?
 
#25 ·
Nice work. I would have done the trunk and frame rails at the same time, since you were that far stripped down. But I understand the cost and time issue. I would not have thought shipping would be that much.

So what is your overall opinion of the car you started with now? Do you think the auction represented the car fairly and let you know all of the issues?
Even if I could have the parts here quickly, I don’t know how much I would do differently. I think I would still continue with the build and get it to at least a rolling chassis to get it to the panel beater. I can have that rear end including the fuel tank stripped and ready to remove the pan and frames in about 4 hours.

The best quote I was able to get for the air freight of the pan and frames was $1150.

Air freight from the US to Australia is really expensive. I have also decided to go the Wilwood D154 Rear Parking Brake Kit.

http://www.wilwood.com/BrakeKits/BrakeKitsProdRear.aspx?itemno=140-12570-R

This was over $300 for air freight.

I still really like the car, the only problem I have found that I didn’t pick up when inspecting it at the auction is the frames. As for knowing the issues, they didn’t say there was rust in the frames, but there is always a risk on a 40 year old car. I only found most of it when I went hard with the needle scaler. I remember trying to shove my head under the car at the auction, but I was having a lot of problems because there was no air in the rear air adjustable shocks.

I’m much more p...ed off about the ’67. I just got lied to.
 
#26 ·
but I needed the block out this Camaro when I found the block in the '67 was stuffed
Ah, I went back and read your original post. I am going to have to read your other thread to find out what the issues were with that car.
 
#27 ·
Ah, I went back and read your original post. I am going to have to read your other thread to find out what the issues were with that car.

Yeah, I have a '67 Camaro sitting in my shed totally stripped waiting on a new floor pan and firewall to arrive from the US. That should be here mid-January. It will take a while for the job to be done too.

But yeah, I don’t want a second car just sitting there waiting for parts or sitting in a shop.
 
#28 ·
I was looking to have someone else build up my diff, but when I was quoted $100 AUS an hour to do the work, so I decided to give it a go myself.

2 shops admitted they had never touched a Chevy 10 bolt and one admitted to really struggling previously with a Chevy 12 bolt, but both seemed happy to take the $100 an hour.

I removed the pinion bearing carefully so I could ream it out slightly to use it to set the pinion depth correctly before pressing on the new bearing

Image


A bearing had obviously been removed before. I'm not reusing this pinion.

Image


Pressing the new bearings onto the carrier with my new press. No expense spared on this thing! It did work well though.

That is a new Richmond 3.73 ring gear that I had already installed.

Image
 
#29 ·
Great job, keep the picks coming. I too am looking to rebuild the 12 bolt in my 69 after an unsatisfactory paid job. Maybe the guy did it right but the whine at cruising speed is annoying.

Must be frustrating not being able to get parts easily. I guess those cars will be worth a fortune there when you get done with them.:yes:

Keep up the good work.!
 
#32 · (Edited)
Pattern looks picture perfect. Care to elaborate on how you got to that?

Thanks, Jeff
Sure, no worries. As I don’t have a pinion depth setting tool, I started by assuming the old pinion was set at the correct depth. The wear pattern looked good and I couldn’t remember any noise coming from it in the limited amount driving i did with it. I never did listen for it though. If I was doing it again, I would check the mesh of the old setup with gear marking compound prior to disassembly.

Using the required pinion depths which are marked on top of the pinion, the new pinion had to sit 7 thou deeper than the old pinion. I checked to make sure the top of pinion to the bottom of pinion (Bearing Seat) measurements were the same. They were which was not surprising as they are both the same brand. The old pinion had 0.032” of shim, so I installed 0.025”, sitting the new pinion 7 thou deeper.

All the above pretty much meant nothing in the end, but it did give me a starting point. You can see from the photo below, the pinion and gear were too far out of mesh when using 0.025” of shim. So from there I checked with 0.030” and then 0.035” of shim. If I was experienced at this I probably would have stopped there, but to make sure I checked with 0.040” and then back down to 0.032” of shim, before going back to 0.035” of shim.

It wasn’t a quick process. I would love to have a pinion depth setting tool to check what the actual depth of the pinion is now.

The backlash was just luck. I was using the original carrier spacers and the backlash just happened to come out at 0.010” which was what was required. The required backlash is marked on the ring gear.

I still have to check the mesh pattern with the new pinion bearing installed and the preload set correctly. I won’t do this until I get the diff in the car because it’s the only way I can think of holding the diff while applying the bearing preload. And I guess the real test will come when I actually drive it.


The installation manual that came with the ring gear and pinion was actually quite good. And I watched this before starting everything too. Not much about getting a good mesh though.

 
#34 ·
This is the majority of the steering items I want to paint including the brake master cylinders. This is actually two cars worth here. I'm doing what I can for the '67 at the same time.

I'll be using an etch primer or rust inhibitor in some cases with a top coat of Eastwood's Spray Gray. I wanted to mix the colours up a bit on some of the cast stuff and use POR-15 Metal Mask on some things, but that went missing in the mail. I'm more worried about stopping rust and keeping it looking good for as long as possible than some concourse correct finish, but I was still keen mix the colours up a bit.

Image


My "Spray Booth". This made painting so much easier but I didn't have any sort of extractor fan, so when I had any seal leaks around my respirator, I knew about it.

Image


My new spray gun! I know it is only the bottom of the line Devilbiss, but it is such a big step up from the $20 special I used on the diffs.

Image


Primer coat.

Image


A rust inhibitor/primer on the old axles for the '67 and a etch primer for the new axels for the '69.

Image