

Well here we go again... One more time with feeling! :yes:
Here is my 69 Grandma car I purchased recently. Bought it from a little 88 year old lady, who was the Original owner. Bought just a few streets over from me, in my neighborhood. Car was purchased new locally and according the little old lady she was the only person that has ever driven the car, until I came along.
I was on the fence about what to do with the car as it is a 6 cylindar car.
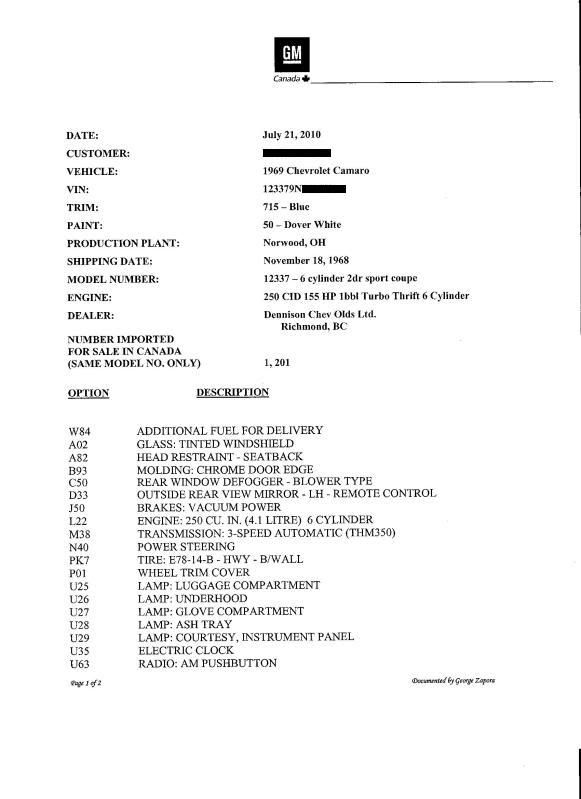
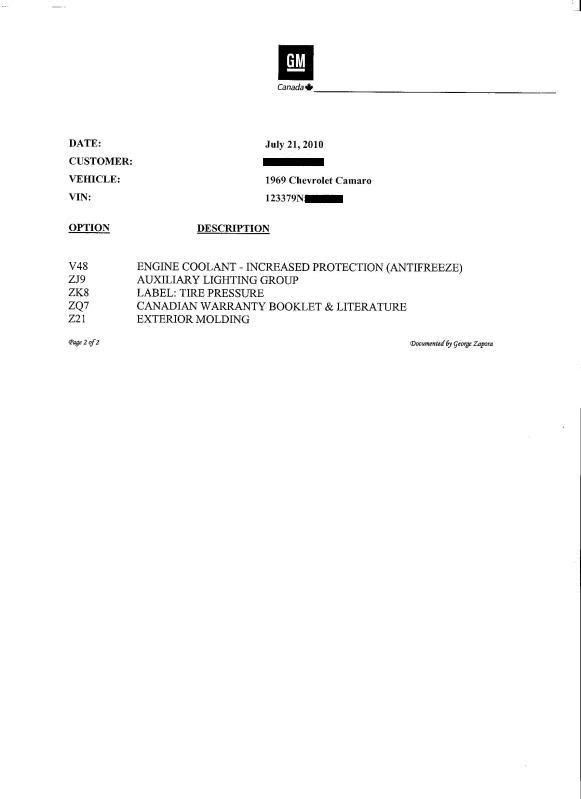
Here is the option list.
![Image]()
![Image]()
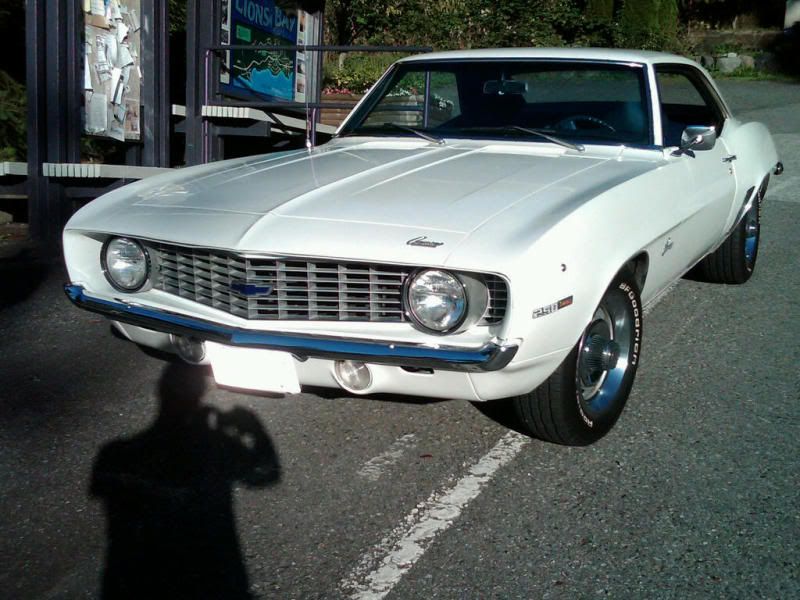
Here is how it looked just before it went into the shop.
![Image]()
Here is the resto plan, that will be done in stages, as I want to pay for it as I go. My friend has a shop and he is letting me do as much work as I can, that my limited skill set will allow. Mainly grunt and shop schlepper work. I will pay for the parts and he will only bill me for the stuff I can't do.
I call it the 10 step plan. My buddy did not give me an estimate but said he would bill me for each step as we go. That will allow me to drive away anytime and return anytime, cash flow depending.
Step one:
Change Rear Passenger quarter, including Outter wheel well.
Step Two:
Remove rear glass and fix window channel rust, and re install so it won't leak. It currently leaks like a sive!
Step Three:
Fix Front passeneger lower fender rust
Step Four:
Romove front Windshield, fix any window channel rust issues. Same issue as rear glass.
Step Five:
Fix Upper cowl and dash pannel rust
Step Six:
Remove all paint to bare metal, prep and primer.
add front & rear spoilers
Step Seven:
Paint car Original color Dover White
Step Eight:
Prep secondary subframe complete with disc breaks, suspension, steering box, brake lines, fully painted
Step Nine:
Install Big Block in subframe with trans
Step Ten:
Drop current subframe, detail firewall install complete subframe.
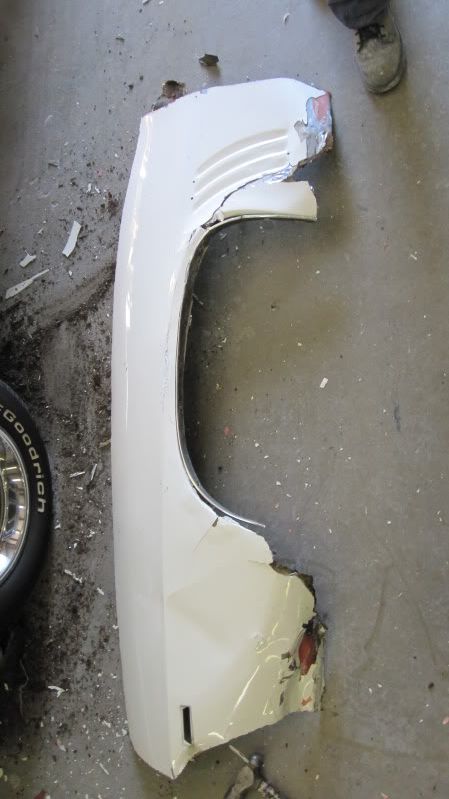
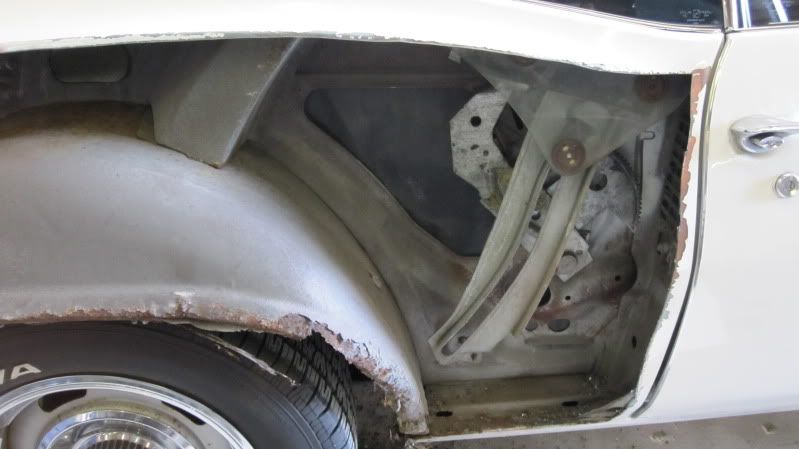
This might all be a fantasy and I might only get to step one, but I am there right now and here is what I did today. Cut off the quarter to see what was underneath and determine what parts to order. Going with an 80% panel as they call it. Once we have the part in hand tomorrow, we will decide the best place to cut and mount. Also going to replace either all or some of the outter wheel well.
![Image]()
The repair that was done to this quarter by the previous shop was hysterical to say the least. It has this tinfoil type of tape all over it and bondo as thick as peanut butter, just slopped on all over the place on top of the tinfoil and rust. We got a real kick out of it.
![Image]()
I was actually surprised with the lack of rust on the outter wheel well as I was expecting to find hell inside the quarter. Also the rear drop off looks like it can be used, so overall happy with the results so far.
![Image]()
So like I was saying that I was undecided on what to do with car, as there was so much great advice. Everything from don't touch it at all and just drive it as is, to Todd's suggestion to go with the COPO Clone. Once Todd sent me the article of the 69 ZL1 that looked almost exactly like my car, the deal was done. That was yesterday and today I am well on my way to somewhere, with any luck.
The way I figure it, no matter how far I get I will always be one step further ahead than I am now. The overall plan is to preserve as much of the car as possible and keep as original as possible. It will be a gradual resto that I can drive as often as possible, and I can stop and restart anytime with funds allowing it. No plans to touch any of the interior at all at this point. It will be a basic repair paint and drive train resto, that I hope won't be too expensive, and will give me a nice driver that I won't be afraid to drive anywhere. Who knows anything can change in this crazy world, but for now I am just going to take it one step at a time...
I have to thank everyone on this site for showing such great support and giving me great advice even if I didn't want to hear it. I hope that this thread will continue until it is done. It won't be a really in depth major resto, but I think that it will be one that I can manage and complete, a very important deatil as I attempted to restor my 68, and needless to say it did not make it to completion. Onward and upward...
Here is my 69 Grandma car I purchased recently. Bought it from a little 88 year old lady, who was the Original owner. Bought just a few streets over from me, in my neighborhood. Car was purchased new locally and according the little old lady she was the only person that has ever driven the car, until I came along.
I was on the fence about what to do with the car as it is a 6 cylindar car.
Here is the option list.
Here is how it looked just before it went into the shop.
Here is the resto plan, that will be done in stages, as I want to pay for it as I go. My friend has a shop and he is letting me do as much work as I can, that my limited skill set will allow. Mainly grunt and shop schlepper work. I will pay for the parts and he will only bill me for the stuff I can't do.
I call it the 10 step plan. My buddy did not give me an estimate but said he would bill me for each step as we go. That will allow me to drive away anytime and return anytime, cash flow depending.
Step one:
Change Rear Passenger quarter, including Outter wheel well.
Step Two:
Remove rear glass and fix window channel rust, and re install so it won't leak. It currently leaks like a sive!
Step Three:
Fix Front passeneger lower fender rust
Step Four:
Romove front Windshield, fix any window channel rust issues. Same issue as rear glass.
Step Five:
Fix Upper cowl and dash pannel rust
Step Six:
Remove all paint to bare metal, prep and primer.
add front & rear spoilers
Step Seven:
Paint car Original color Dover White
Step Eight:
Prep secondary subframe complete with disc breaks, suspension, steering box, brake lines, fully painted
Step Nine:
Install Big Block in subframe with trans
Step Ten:
Drop current subframe, detail firewall install complete subframe.
This might all be a fantasy and I might only get to step one, but I am there right now and here is what I did today. Cut off the quarter to see what was underneath and determine what parts to order. Going with an 80% panel as they call it. Once we have the part in hand tomorrow, we will decide the best place to cut and mount. Also going to replace either all or some of the outter wheel well.
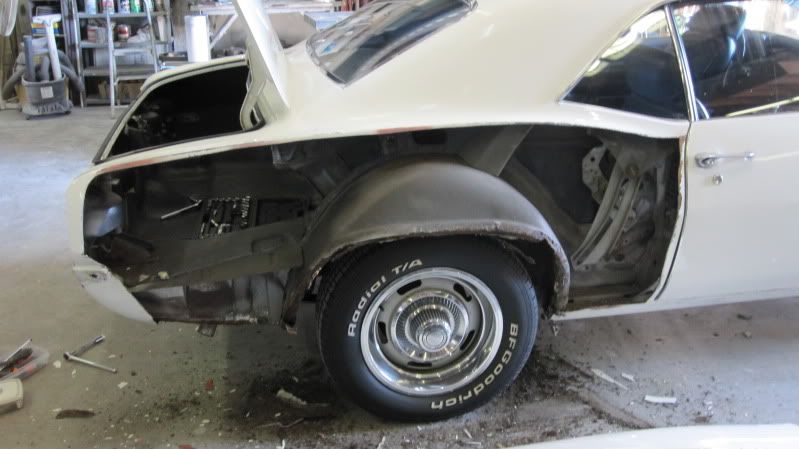
The repair that was done to this quarter by the previous shop was hysterical to say the least. It has this tinfoil type of tape all over it and bondo as thick as peanut butter, just slopped on all over the place on top of the tinfoil and rust. We got a real kick out of it.
I was actually surprised with the lack of rust on the outter wheel well as I was expecting to find hell inside the quarter. Also the rear drop off looks like it can be used, so overall happy with the results so far.
So like I was saying that I was undecided on what to do with car, as there was so much great advice. Everything from don't touch it at all and just drive it as is, to Todd's suggestion to go with the COPO Clone. Once Todd sent me the article of the 69 ZL1 that looked almost exactly like my car, the deal was done. That was yesterday and today I am well on my way to somewhere, with any luck.
The way I figure it, no matter how far I get I will always be one step further ahead than I am now. The overall plan is to preserve as much of the car as possible and keep as original as possible. It will be a gradual resto that I can drive as often as possible, and I can stop and restart anytime with funds allowing it. No plans to touch any of the interior at all at this point. It will be a basic repair paint and drive train resto, that I hope won't be too expensive, and will give me a nice driver that I won't be afraid to drive anywhere. Who knows anything can change in this crazy world, but for now I am just going to take it one step at a time...
I have to thank everyone on this site for showing such great support and giving me great advice even if I didn't want to hear it. I hope that this thread will continue until it is done. It won't be a really in depth major resto, but I think that it will be one that I can manage and complete, a very important deatil as I attempted to restor my 68, and needless to say it did not make it to completion. Onward and upward...

")


