Team Camaro Tech banner

LS Engine/4L80E Trans Into a '69

50K views 73 replies 13 participants last post by  2BFAST  
#1 ·
I figured rather than clogging up the overall build thread for my '69 with all the LS swap stuff I'd start a new thread.

I picked up a 6.0l out of a 2002 Silverado 2500 with 130,000 miles for $2k. That sounds like a lot of mileage when you think about it in terms of the older Chevy engines, but these things have been know to go 250k without needing a rebuild. The plan is to get it cleaned up, do a cam swap, install all the required mounts/adapters, and get it set into place in a few weeks. The wiring, fuel system, cooling, etc., will wait until March when the next round of funds come in.

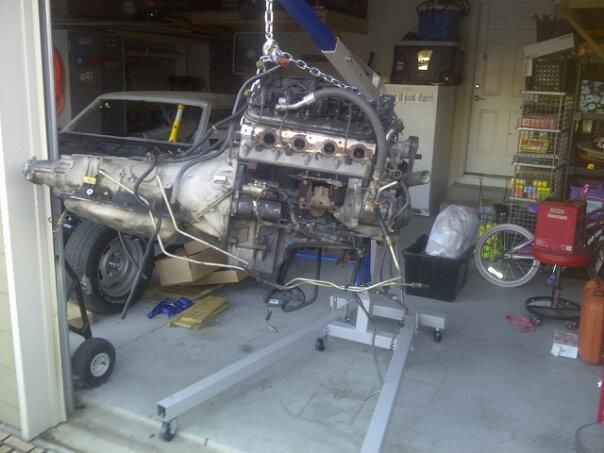
Here she is coming out of the truck bed a few weeks ago

Image


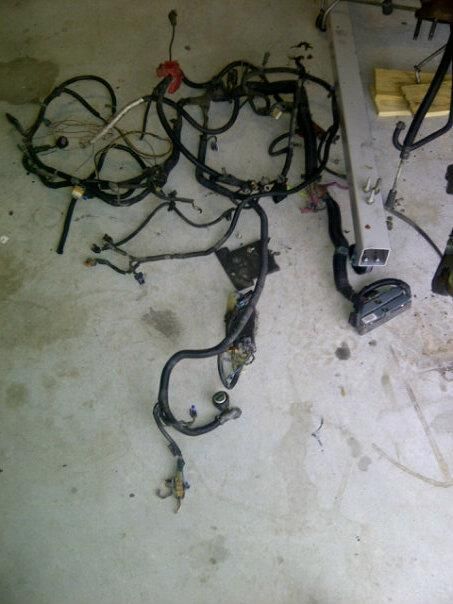
I started disassembly with removal of the wiring harness

Image


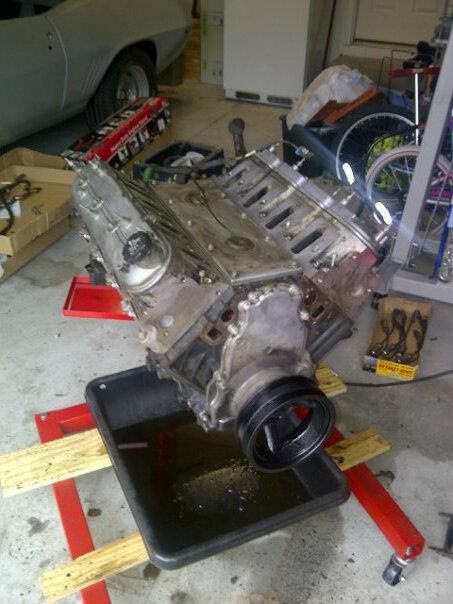
I then took the trans and converter off so I could get the engine on the stand

Image


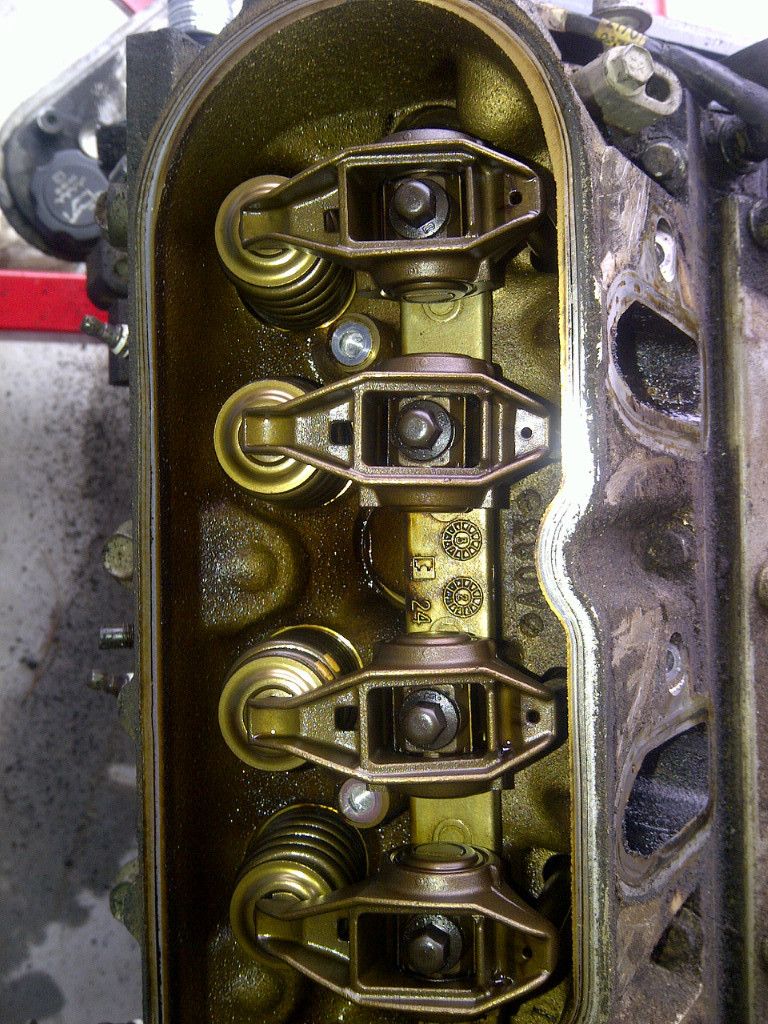
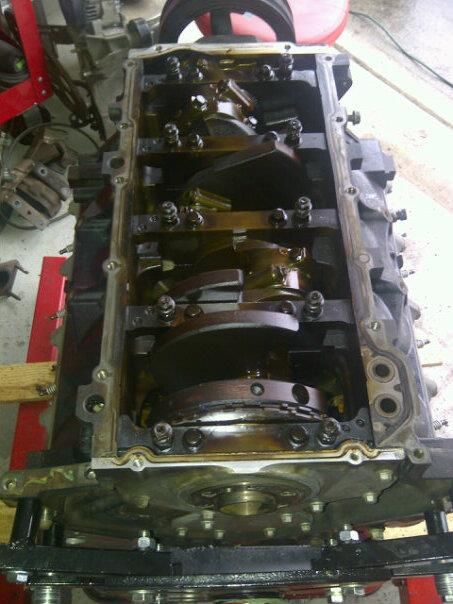
Both the cylinder heads and the bottom end are incredibly clean for an engine with 130k

Image


Image


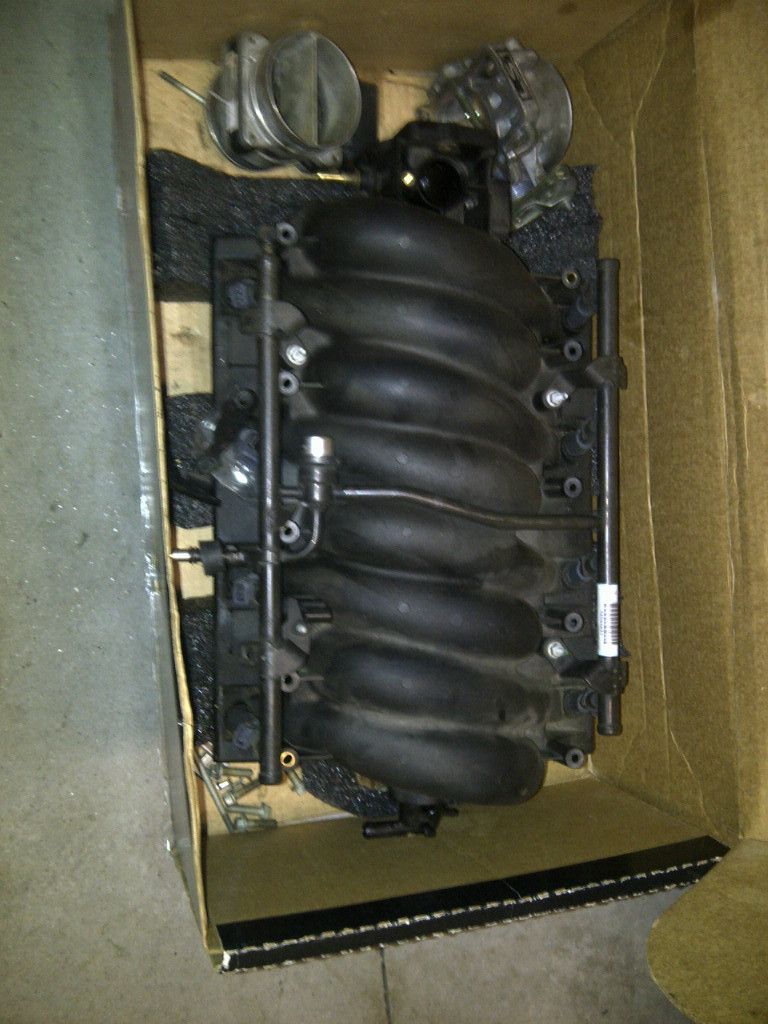
Here's the LS1 intake that I picked up for $150, including the rails and injectors.

Image


I got the block and heads cleaned up, and had three exhaust studs broken off flush with the heads that had to be removed by welding a washer and a bolt to them. Once that was fixed, I got the heads and block painted, and set the intake on.

Image


I'm using Hooker engine mount adapters, which bolt to the 4-bolt arrangement on the block and have 3 holes to accept the standard old-style motor mount. I went with "stock location" plates, which will place the bellhousing right about where it normally was. They're also available in a few other configurations that slide the engine forward (to allow accessory clearance at the subframe), but that would cause interference between the oil pan and the center link.

Image


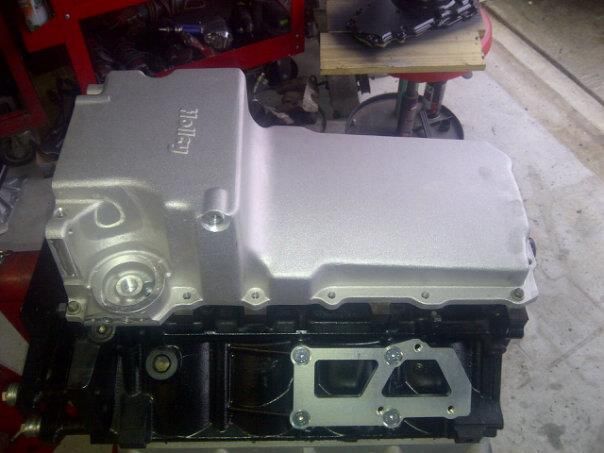
The oil pan is Holley's Retro LS pan, which is a beautiful cast aluminum piece thats designed specifically to provide clearance at the center link. There are less expensive options out there, like the GM musclecar pan ($180 vs $400 for the Holley pan), but they're much deeper and hang a few inches below the subframe, which is a bad thing.

Image


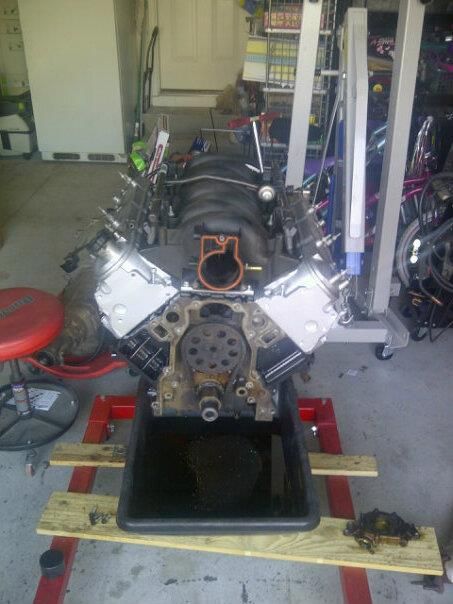
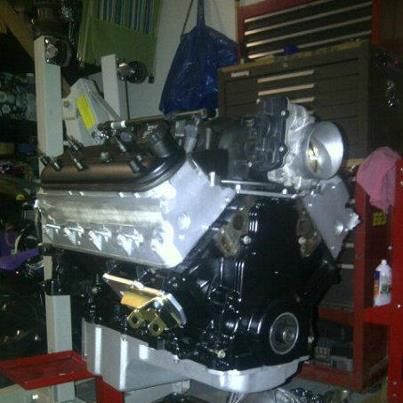
Here's a shot with the oil pan, intake and front cover temporarily in place. I've got a Z06 Corvette cam and valve springs coming this week that will go in over the weekend, and I'll post pics of that next week. I went with a semi-gloss black on the block, cast aluminum on the heads, and flat black on the valve covers just to break it up a bit.

Image
 
#4 ·
I'll have a pair of 243's (LS6) I'm taking off my kids ZO6 in a few weeks. We are putting a blower on it with a new set of heads.

We will let them go cheap. Let me know if interested:beers:
 
#5 ·
I'll have a pair of 243's (LS6) I'm taking off my kids ZO6 in a few weeks. We are putting a blower on it with a new set of heads.

We will let them go cheap. Let me know if interested:beers:
I'm at the edge of my budget right now- if I swap heads, it's gonna be after this thing is up and running, and then only if I'm not happy with the performance (which I think I'll be fine with).
 
#6 ·
Made some good progress this weekend while waiting for my cam and springs to show up.

Got the trans cleaned up and painted, and ordered the AN fittings for the trans cooler lines. The 4l80e needs a special fitting at the back cooler line that has an extended nipple, which is only available from a few places. Mine are coming from Sweet Performance in CA.

Image


Also got the BMR Suspension adjustable crossmember installed. It's a really clean piece that allows about 3" of forward/aft adjustment of the trans mount, and tucks up nice for exhaust clearance.

Image


Image


Image


I also found that the "stock location" Hooker LS mounts put the engine too far back- the bellhousing mounting flange at the back of the engine basically hits the firewall. So, I ordered another set of mount plates that shift everything forward 1.25", which will be here tomorrow. There still looks to be tons of room at the oil pan/center link area, and I considered going with 3" forward mounts, but that'll just put the engine too far forward and potentially create header clearance issues at the steering box. Fun stuff!
 
#7 ·
Looks good.... I'll need the same cross-member since I'm going with a 200R4 trans... What are you doing for a driveshaft?
 
#9 ·
I could only imagine. You're brave to tackle the engine/trans wiring harness too. That would deter me a bit... "fear of the unknown"...

Any luck on finding the interior yet?
 
#11 ·
The driveshaft is the 'easy' part! :)

I can't wait to get started. Glad you're a few steps ahead of me Bob. :thumbsup: But you've got sunshine and clear roads... I have to deal with brutal temps and ice. The garage floor isn't as friendly. But it's a small price to pay. I don't want to lose any cruising time this Summer.

Keep it up Bob... looking good!
 
#15 ·
Got the Z06 cam and lifters today, and got them installed.

Here's a shot of the new cam and the old cam- the difference in lobe profiles is pretty apparent.

Image


The cam slid in nice and easy with a bunch of Lucas assembly lube. The lifters on LS engines are held in lifter trays, which are supposed to hold the lifters up off the cam if you spin it a few times to click them up into the trays. It doesn't always work, though, and if a lifter drops while the cam is out, it's a royal PITA to get it back in, since the lifters are under the heads. So what's the foolproof solution? Spin the engine upside down, so the lifters can't fall out. It's much easier to do that with the engine out of the car..... ;)

Image


Once the cam was in and the thrust plate, timing chain and oil pump were back on, it was time to tackle the valve springs. I picked up TrickFlow's spring compressor, which bolts to two rocker mount holes and compresses two springs at a time. With an AirHold hose screwed into the spark plug hole to keep the valves up, it was extremely easy to swap the springs. I had the whole set swapped in less than an hour.

I should have taken a pic with the spring compressor in place, but I always forget to snap pics during the actual work. Maybe I should hire Todd to come document my build better....lol

Image


If all goes well, I'll get the rockers/pushrods back in tonight, and button up the valve covers, oilpan and front cover. The trans will get mated back to the engine tomorrow night, and hopefully the engine/trans will get dropped in on Saturday.
 
#16 ·
I'm available Mon-Fri 6pm-10pm, and on weekends. :D

Nice work Bob! Exciting part of the build for sure. Power! Looks like you'll be seeing lots of Fords in your rearview! :yes::cool:
 
#17 ·
I'm available Mon-Fri 6pm-10pm, and on weekends. :D
I think the commute might kill you, though......;)


Nice work Bob! Exciting part of the build for sure. Power! Looks like you'll be seeing lots of Fords in your rearview! :yes::cool:
It's not really all that much- 300hp stock, so probably 350hp or so with the cam and headers. Other than that, it's staying stock. Given the 800lb +/- weight difference between these cars and the new Camaros and Mustangs, it should make for some fun, without being ridiculous. 20mpg +/- will be nice too.
 
#19 ·
Alright. Got the engine and trans in on Saturday. It went on on the first try with the help of a few neighbors and a leveler on the hoist. Having the front end off made it easier, I'm sure. The only issue I had was the Hooker swap mounts move the mounts forward 1 1/4", but also up 1/4", which spreads the holes where the mounts meet the frame stands apart. With one bolt in, the other one was off by about 1/2". I took the frame stands off and elongated the holes with a die grinder (both where they mount to the subframe and the holes that catch the motor mount), an everything fell right into place after that.

Here it is on the hoist, ready to go in.

Image


And a shot after the first placement.

Image


For those wondering about the trans clearance on the 4l80e, here's a shot up the tunnel. There's a good 3/4" or more of clearance all the way up.

Image


The trans cooler lines have about 1/2" of clearance as well. The AN adapters from Sweet Performance and some 90 degree fittings from Summit made it all work.

Image


And here's a shot of the BMR adjustable crossmember. It tucks up really tight for exhaust clearance, and fits great.

Image


And here she is with the intake set in place. I spent yesterday cleaning and painting the intake (after this shot was taken), re-wrapping the coil pack wiring, and getting the coil packs installed. More photos to follow soon.

Image
 
#22 ·
Very nice work! :beers::cool: You're also paving the way for many others on here too... :yes:
 
#24 ·
I'd have to measure it, but I'd say there's a good 1 1/2" of vertical clearance between the sway bar and the balancer. Remember- the crank centerline on the LS is up in the block, and the oil pan flange is flat, unlike the Gen I engines that have the balancer sitting much lower relative to the botom of the pan. The bottom of the balancer sits about even with the top of the pan. The oil pan is pretty tight vertically relative to the subframe- probably only 1/4" of clearance, but there's gobs of room between the sump and the centerlink, which is where most folks have issues when they're trying to get pans to fit. The bottom of the pan is also just barely below the subframe, whereas my buddy who used the GM Musclecar pan has about 2 1/2-3" of pan hanging below his subframe- he's just inviting a disaster with that thing......
 
#27 ·
I'm still looking for my LS (LQ) engine, but I saw one of those GM Musclecar pans on ebay for under $100 and almost pulled the trigger. One quick google search and I found out why someone was selling it so cheap. I think I'll be using the Holley pan as well.
 
#36 ·
You make it look so easy Bob. Is it? :beers:
I wouldn't say it's hard- just need to do a bunch of research and pick a path of parts that work together. There's been no fabrication required like when they first started sticking these engines in these old cars, other that a little die grinder work on the motor mount holes, cutting a small piece off the alternator/ps pump bracket to move the idler pulley, and a little grinding on the throttle body to clear the water pump. That last bit could have been avoided with a cable-operated throttle body, but I want drive-by-wire, so it was worth the five minutes of work.

Thank God for the Internet, though- makes these things so much easier to figure out.
 
#37 ·
Nice work Bob! This will help out many others. :beers: Definitely got me doing my research on it now.